PreEmptive Protection™ DashO™ Ant tasks are in ant-dasho.jar. This jar must be integrated with Ant. An optional configuration step can be performed before this to make the use of DashO's tasks easier.
Note: When you update DashO, you need to also update the jar used by Ant.
Configuring dasho.ant.runtime.properties
As discussed in Setting DashO Home and Setting DashO License the Ant tasks need to know where DashO is installed and possibly the license key. One of the options is to set these values in a properties file stored in ant-dasho.jar. Setting the home value this way lets buildfiles run with minimum configuration. It is not required that this file be configured as there are other ways to specify where DashO is installed.
To see the values that the task will use you can run the antconfig script:
C:>antconfig show
dasho.home=C:/Program Files/PreEmptive Protection DashO x.y/app
dasho.fullVersion=x.y.z
dasho.version=x.y
dasho.license(masked)={masked license}
If the value returned for dasho.home is correct your configuration is complete. If you have installed DashO in another directory you will need to specify a new location. The simplest method is to let the value be configured automatically:
C:>antconfig
dasho.home=C:\Users\lizardo\DashO x.y\app
dasho.license(masked)={not configured}
If the value cannot be determined automatically, you can specify it:
C:>antconfig
C:\Users\lizardo\some\directory does not contain DashOPro.jar
C:>antconfig "C:\Program Files\PreEmptive Protection DashO x.y\app"
dasho.home=C:\Program Files\PreEmptive Protection DashO x.y\app
dasho.license(masked)={not configured}
Note: Paths that contain spaces must be quoted.
If you need to also configure the license, you can add the license string after the path to DashO:
C:>antconfig "C:\Program Files\PreEmptive Protection DashO x.y\app" licenseKey[:email]
dasho.home=C:\Program Files\PreEmptive Protection DashO x.y\app
dasho.license(masked)={masked license}
Note: Be sure to maintain proper control of your licensing keys.
Where to install the tasks
Ant can find tasks stored in one of two locations:
- ant.lib directory - tasks placed in this directory are accessible to all users of Ant.
- USER_HOME/.ant/lib directory - tasks found here are available to a single user.
You can determine these locations by running Ant for the command line - be prepared for lots of output!
C:>ant -diagnostics
...
-------------------------------------------
 ANT_HOME/lib jar listing
-------------------------------------------
ant.home: C:\Program Files\apache-ant-1.9.9
...
-------------------------------------------
 USER_HOME/.ant/lib jar listing
-------------------------------------------
user.home: C:\Users\lizardo
...
This means that the two choices for installing the task are C:\Program Files\apache-ant-1.9.9 and C:\Users\lizardo\.ant.
Installing the tasks
Once you have chosen the installation directory you can use the antinstall script to install the Ant tasks:
C:>antinstall "C:\Users\lizardo\.ant"
Creating C:\Users\lizardo\.ant
Creating C:\Users\lizardo\.ant\lib
Copying ant-dasho.jar to C:\Users\lizardo\.ant\lib
Installation complete
Note: Paths that contain spaces must be quoted.
Installing the tasks into Eclipse
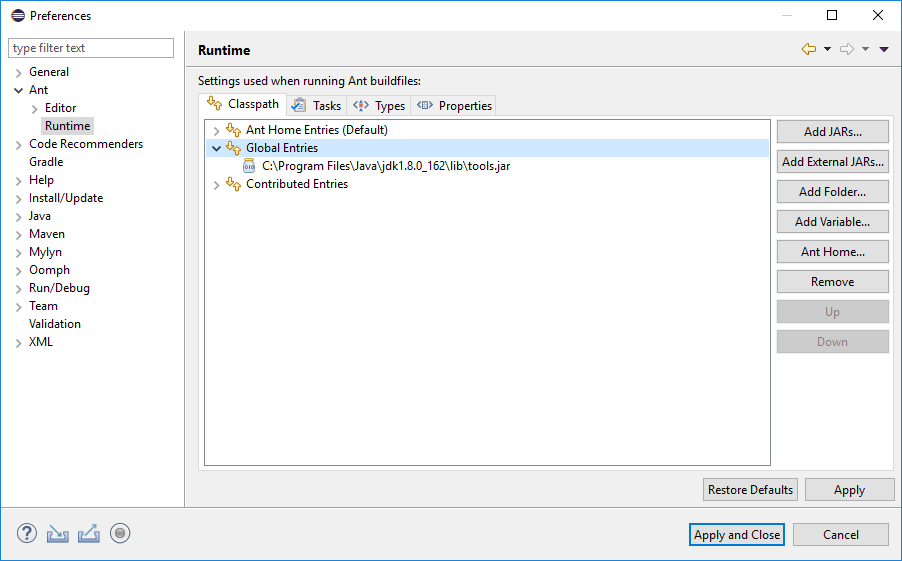
If you chose to install the Ant tasks in your USER_HOME/.ant your configuration is complete - Eclipse will discover the jar stored here and add it to the classpath of its internal version of Ant. Otherwise you need to tell Eclipse to add the jar to Ant's classpath via Eclipse's preferences:
- Open Eclipse's Preferences dialog using Window > Preferences… from the menu bar.
- Use the navigation tree to go to Ant > Runtime. The dialog will look something like this:

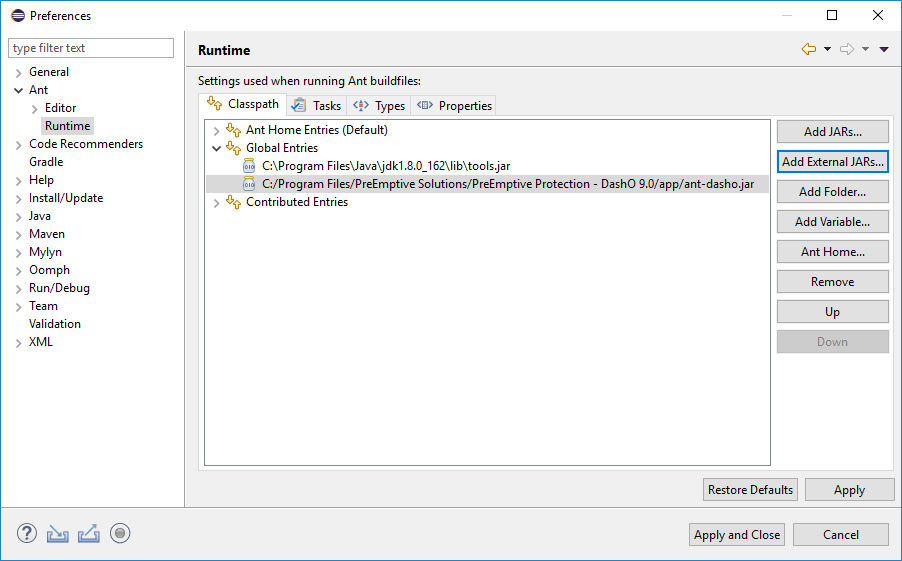
- Select Global Entries and then click on Add External Jars….
- Use the file selector to go to where DashO has been installed and add ant-dasho.jar.
The resulting dialog will look something like this:

- Click on Apply and Close to save the changes.
Eclipse configuration is complete.
