Checks Configuration
The Checks screen is used to configure Checks.
You can access this screen in Dotfuscator Community's navigation list by selecting Checks. This screen contains three tabs: an informational "Getting Started" tab, a "Configuration" tab for specifying the "Checks", and a general "Options" tab.
Getting Started Tab
This tab provides general information about Checks.
Configuration Tab
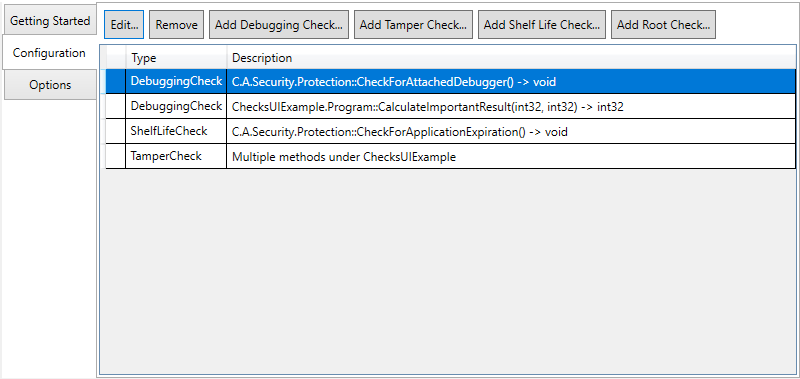
The Configuration tab allows you to add, edit, and remove Checks.
This tab displays a table listing all of the Checks that are configured in the current Dotfuscator config file and any Checks that may be configured via custom attributes in the input assemblies.

Table Columns:
The first column only shows icons if you are using in-code attributes to define Checks.
The Check Type column indicates which of the possible Check Types this Check is.
The Description column describes the locations in the input assemblies that have this Check.
- Method signatures in this column are abbreviated, and only the common namespace is displayed if there is more than one location for the check. To see a full, unabbreviated listing of these method signatures, you can look at the tool tip for the Check's description.
Defining Checks in the GUI
To add a Check:
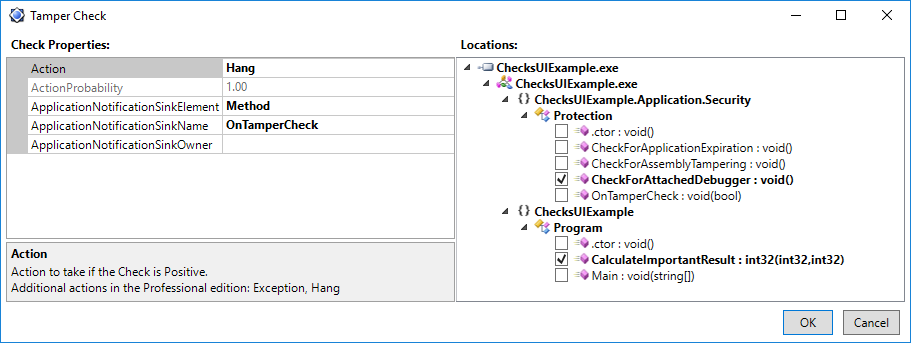
Click the button that corresponds to the type of check you want to create: Add Debugging Check..., Add Tamper Check..., Add Shelf Life Check..., or Add Root Check.... An editor for the new Check will open.
In the grid on the left side of the editor, configure the properties for your Check. See the section on Property Editing for more detailed instructions.
In the code tree on the right side of the editor, select the Locations in your input assemblies that you wish to be injected with this Check. Each location can only be associated with one Check of a particular check type.
Click OK to save. A new row in the table will appear for the Check.
You can edit a Check by highlighting the Check in the table and then clicking the Edit button. The Check's editor will open, and you can edit its properties as well as change its locations.
You can remove a Check from the config by highlighting the Check in the table and then clicking the Remove button.
Working with Checks Defined by In-Code Attributes
The Checks tab also displays check attributes specified in your source code. When working with these in-code attributes, there are a few things to keep in mind:
You can override an in-code attribute-defined Check with a user interface-defined Check. Dotfuscator will then ignore the in-code attribute and will not represent it with its own row in the table of Checks. The user interface-defined Check will be used instead. Overriding happens when either of the following occurs:
You edit the properties of or add a location to an in-code attribute-defined Check via the GUI. Because Dotfuscator does not access the source code, this causes a user interface-defined Check to be created with the changed values and/or additional locations.
You add a location to a user interface-defined Check such that the location already has an in-code attribute of the same Check Type.
If you remove a user interface-defined Check that was overriding an in-code attribute, the in-code attribute will once again take effect.
You cannot remove in-code attributes using the Dotfuscator UI. If you wish to remove a Check defined by an in-code attribute, you must remove it from the source code itself.
The first column of the Checks table will display icons if you are using in-code attributes to configure Checks:
No icon is displayed if the Check was added from the user interface and does not override a Check defined by an in-code attribute.
 is displayed if the Check is fully specified by an in-code attribute.
 is displayed if the user interface-defined Check overrides at least one in-code attribute.
Editing Properties
Modifying properties of Checks is usually straightforward; the supported fields will accept free text (for most string properties), provide a drop-down list of supported values, or provide a date picker.
However, some properties, when selected, will also display a "..." icon. Clicking it will display an additional editor for populating the field. These editors are described in the following subsections.
In addition, the Checks property documentation explains what each of the specific properties means and what behavior it controls.
Owner Type Selection Dialog
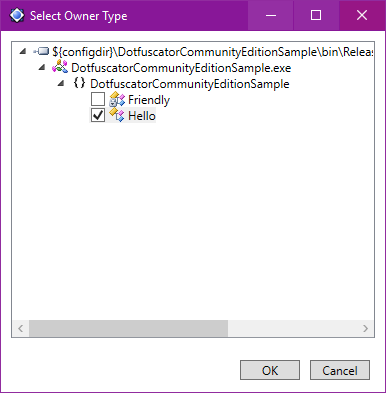
An Owner property of sinks, such as OptInSourceOwner, specifies a type within the config. On these Owner properties, clicking the "..." icon will open the following dialog:
From here, you can choose which type the property will reference.
Browse Dialog
On the ActivationKeyFile property of a ShelfLifeCheckAttribute, clicking the "..." icon will allow you to browse to and select a Shelf Life Activation Key.
Options Tab
This tab allows you to configure the injection process at the config level.
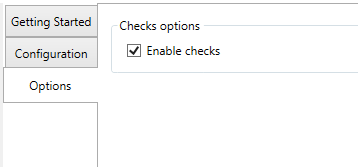
There is one option available:
Enable checks: Acts as a master switch for the entire Check injection process. If checked, injection will be performed as specified by the Check settings configured in Dotfuscator as well as by all check attributes contained with the input assemblies. If unchecked, no Check injection of any kind will occur.
This setting can also be controlled by right-clicking on the Checks line in the navigation list, and checking or unchecking Enable.
Even if Check injection is disabled, any in-code Check attributes will be removed from the processed assemblies. This behavior is controlled by each input assembly's Strip check attributes option, which cannot be disabled in Dotfuscator Community.


