The Config Editor
Here we explain how to use the Dotfuscator Config Editor. For a complete reference on Dotfuscator's config file see the Config File Reference page.
- Launching the Editor
- The Main Window
- Working with Configs
- Working with Inputs
- Directory Inputs
- Silverlight Inputs
- ClickOnce Inputs
- Windows Store Inputs
- The Settings Tab
- Options
- Properties
- Build Settings
- Build Events
- Reports
- Feature Map Strings
- User Defined Assembly Load Path
- Configuring
- Building
- The Output Tab
- Set User Preferences
- Opening the Config Editor from the Command Line
Launching the Editor
To launch the Config Editor, use the Start Menu shortcut Dotfuscator Pro Config Editor.
Alternatively, you can run the executable directly.
The name of the Dotfuscator Config Editor executable is dotfuscatorUI.exe
It is available in the installation directory, which is provided by the environment variable DOTFUSCATOR_HOME.
If possible, the installer adds %DOTFUSCATOR_HOME% to the PATH, so in most cases you can just run dotfuscator from the command line unqualified.
DOTFUSCATOR_HOME environment variable will not be available in this scenario.
The Main Window
The main Dotfuscator window consists of four vertically arranged activity zones:
- At the top, the familiar Windows Menu Bar
- Below that menu, a toolbar appears for frequently accessed actions
- Below the toolbar, a tabbed section appears that organizes the specification and command activities for the config
- At the bottom, a tabbed, scrollable console pane is provided for viewing output.
Working with Configs
To create a new config, you need to do three things:
1: Select Inputs
From the Input Tab, you can use the toolbar to add an input package and/or assembly. From the Add Input dialog, you can type in the package or assembly’s directory and file name, type in a directory and file mask, or browse the file system for an input or folder.
2: Specify the Destination Directory
When you create a new config, the output directory is set by default to ${configdir}\Dotfuscated.
${configdir} is a built-in property that is expanded to the folder that your config file is saved to.
Alternatively, you can browse your file system for the intended destination directory.
3: Save the Config File
The config file must be saved to disk before Dotfuscator can build it. To save, click the Save icon on the toolbar or select File > Save (Ctrl+S) from the menu. The first time you save a new config file, you will be prompted to enter a location on disk for the new file.
To open an already-saved config file, click the Open icon on the toolbar or select File > Open (Ctrl+O) from the menu.
The Config Editor's title bar displays the currently loaded config file path.
An asterisk (*) after this path indicates that there are unsaved changes.
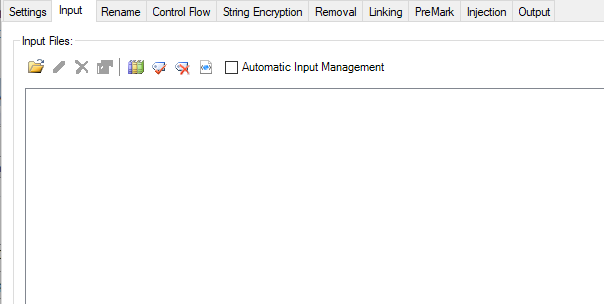
Working with Inputs
Adding Assemblies
The Input tab is used to specify a combination of packages and/or assemblies for the config. With the Add New Input button on the toolbar, you can add a new package or assembly to your config. Clicking on the button brings up the Add Input dialog, where you can enter the package or assembly’s directory and file name or file mask, or browse for it in the file system.
Using the Browse window, you can add multiple packages and/or assemblies by multi-selecting the ones you wish to add.
You may also drag and drop packages or assemblies into the Input Assemblies list.
Editing and Removing Inputs
The Edit and Remove buttons are used to change or remove inputs from the config. To use, highlight an input on the list and click on the appropriate toolbar button. You can also delete an input by highlighting it and pressing the Delete key.
When editing an input path, the text you type can have a Property embedded in it. For example:
Property:
c:\${inputdir}\myapplication.exe
Property substitution takes place based on the precedence rules specified in the section on Property List and Properties. You can view the actual, fully resolved value by placing the cursor on the item that has a Property embedded in it.
Input Properties
Packages can have specific options. If the selected package has any available options the Input Properties button on the toolbar will be active.
Library Mode
Library mode can be toggled for all assemblies using the library button on the toolbar.
Alternatively, you can select library mode for specific assemblies by checking or unchecking the Library checkbox under the input assembly’s entry in the list.
Transform XAML Mode
Transform XAML mode can be toggled for all assemblies using the Transform XAML button on the toolbar.
Alternatively, you can set the XAML Transform mode for specific assemblies by checking or unchecking the Transform XAML checkbox under the input assembly’s entry in the list.
Excluding or Including Package Assemblies from Processing
Specified assemblies contained in packages can be excluded from being round tripped through Dotfuscator by right clicking on the assembly node in the package and selecting Exclude assembly from package. This will cause the assembly to be added to the list of package artifacts that are not processed by Dotfuscator. By being added to the artifacts list assemblies are exempt from any obfuscation and instrumentation and all existing strong naming and signing is preserved. This can be switched back by right clicking again and choosing Include assembly in package.

Declarative Obfuscation
The Honor Obfuscation Attributes and Strip Obfuscation Attributes settings are related to Declarative Obfuscation. They can be toggled for all input assemblies using their respective buttons on the toolbar.
Alternatively, you can configure these settings for specific assemblies by checking or unchecking the appropriate checkbox under the input assembly’s entry in the list.
Injection Attributes
The Honor Injection Attributes and Strip Injection Attributes assembly-level injection settings can be configured for specific assemblies by checking or unchecking the appropriate checkbox under the input assembly’s entry in the list.
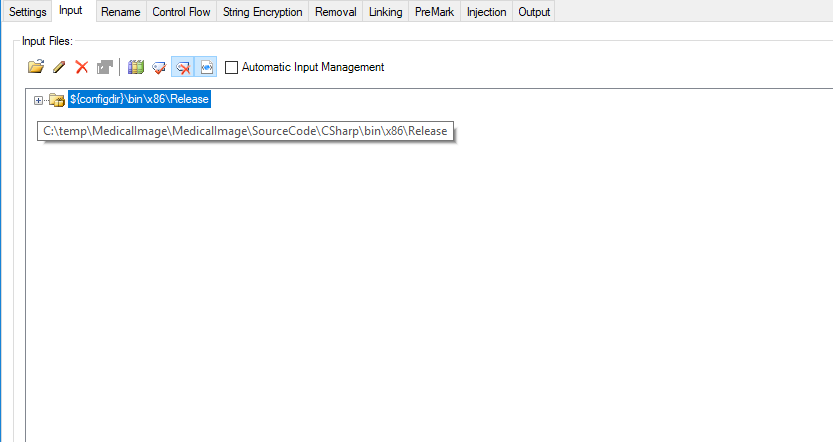
Directory Inputs
Dotfuscator provides the ability to obfuscate and/or instrument all files in a directory via a Directory Package input. A Directory Package consists of a relative or absolute path to a directory and optionally a wildcard specifier (file mask) of which files to match. All managed assemblies that match the file mask will be used as inputs to Dotfuscator. Any unmanaged assemblies or other files that match the file mask will be listed as Package Artifacts and, while not processed by Dotfuscator, will be copied to the output directory during the build process.
To add a Directory Package, select Add Input and type the path and a file mask wildcard to the Add Input dialog box. You can also add an entire directory of files (*.*) by selecting the Browse button, navigating to the directory of your choice and leaving text Folder Select in the file name prompt. You can specify an explicit path or use a Property to specify a substitution property for all or part of the path.
All settings will be applied to all Directory Package assembly inputs and exclusion rules can be created and saved in the Dotfuscator config for any assemblies contained in the list of package assemblies.
Silverlight Inputs
Dotfuscator provides the ability to specify a Silverlight deployment file, .XAP, as an input. A Silverlight Package consists of a single XAP file which will be parsed and presented in the user interface as a Silverlight Package. All managed assemblies that are contained in the XAP will be used as inputs to Dotfuscator. Any other files contained in the XAP will be listed as Package Artifacts and, while not processed by Dotfuscator, will be included in the output XAP in the output directory. Dotfuscator will output a single XAP that contains obfuscated and/or instrumented assemblies, an updated manifest and any other non-assembly files from the input XAP.
To add a Silverlight Package select Add Input and type the path and a file name in the Add Input dialog box. You can also browse to the specific XAP file by selecting the Browse button and navigating to it. You can specify an explicit path or use a Property to specify a substitution property for all or part of the path.
All settings will be applied to all Silverlight Package assembly inputs and exclusion rules can be created and saved in the Dotfuscator config for any assemblies contained in the list of package assemblies.
A Silverlight 4 package that is signed can be re-signed by Dotfuscator. The signing options are accessed via the Package Properties button or context menu entry and consists of the Certificate File, Certificate Password, and Timestamp Server URL settings. The Silverlight certificate options set the certificate file container and optional certificate password and timestamp server that are used to sign the output XAP file.

ClickOnce Inputs
Dotfuscator provides the ability to specify a ClickOnce deployment manifest file, .APPLICATION, as input. A ClickOnce Package consists of a single .APPLICATION file which will be parsed and presented in the Config Editor as a ClickOnce Package. All managed assemblies that are contained in the application will be used as inputs to Dotfuscator. Any other files contained in the deployment and application manifests will be listed as Package Artifacts and, while not processed by Dotfuscator, will be included in the output application in the output directory. Dotfuscator will output to the output directory all obfuscated and/or instrumented assemblies, all necessary manifests, and any other non-assembly files from the input manifests.
To add a ClickOnce Package select Add Input and type the path and a file name in the Add Input dialog box. You can also browse to the specific deployment manifest file by selecting the Browse button and navigating to it. You can specify an explicit path or use a Property to specify a substitution property for all or part of the path.
All settings will be applied to all ClickOnce Package assembly inputs and exclusion rules can be created and saved in the Dotfuscator config for any assemblies contained in the list of package assemblies.
A ClickOnce Package has two required properties that are accessed via the Package Properties button or context menu entry, the Certificate File and Certificate Password settings. The ClickOnce certificate options refer the certificate and optional certificate password that are used to sign all of the output manifest files.

Windows Store Inputs
Dotfuscator provides the ability to specify a Windows Store deployment file, .APPX, as an input. A Windows Store Package consists of a single APPX file which will be parsed and presented in the user interface as a Windows Store Package. All managed assemblies that are contained in the APPX will be used as inputs to Dotfuscator. Any other files contained in the APPX will be listed as Package Artifacts and will be included in the output APPX in the output directory. Dotfuscator will output a single APPX that contains obfuscated and/or instrumented assemblies, an updated manifest and any other non-assembly files from the input APPX.
To add a Windows Store Package select Add Input and type the path and a file name in the Add Input dialog box. You can also browse to the specific APPX file by selecting the Browse button and navigating to it. You can specify an explicit path or use a Property to specify a substitution property for all or part of the path.
All settings will be applied to all Windows Store Package assembly inputs and exclusion rules can be created and saved in the Dotfuscator config for any assemblies contained in the list of package assemblies.
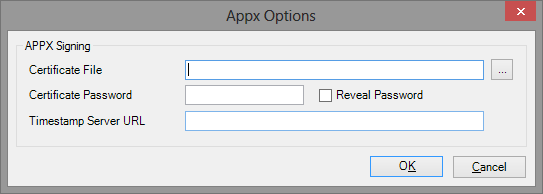
All Windows Store packages are signed and must be re-signed by Dotfuscator. The signing options are accessed via the Package Properties button or context menu entry and consists of the Certificate File, Certificate Password, and Timestamp Server URL settings. The APPX certificate options set the certificate file container and optional certificate password and timestamp server that are used to sign the output APPX file.
The Settings Tab
The Settings tab allows you to configure options, properties, build settings and events, code signing, reporting, feature map strings for declarative obfuscation, and user-defined assembly load paths. You can choose the feature you wish to edit by selecting the appropriate node in the navigation pane on the left side of the tab.
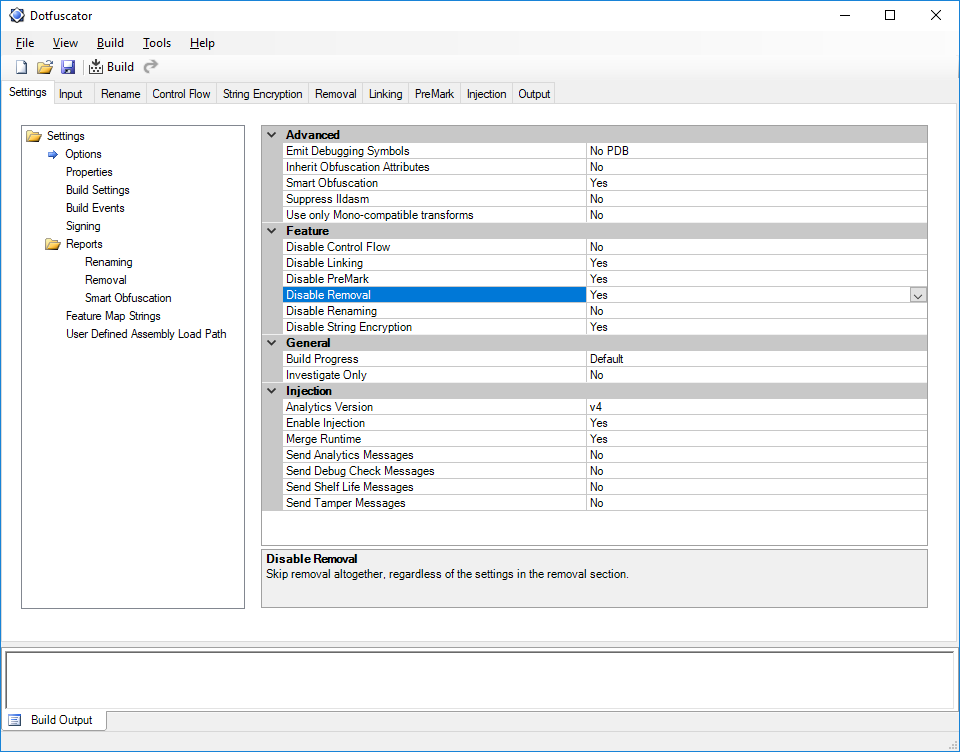
Options
The options editor allows you to set the options for the config.
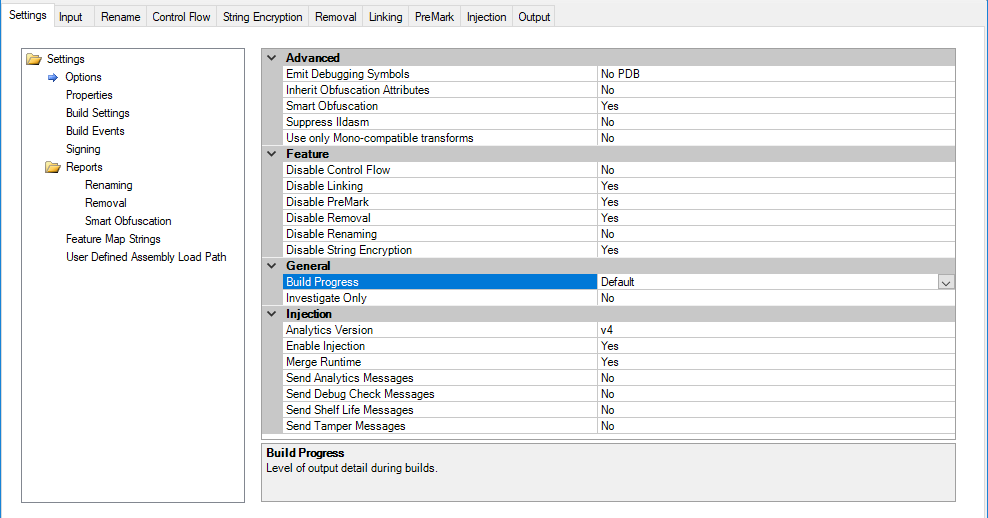
You can selectively enable or disable Dotfuscator’s features, such as renaming, from this tab. Additionally, you may also modify the following options:
- Emit Debugging Symbols: Control how Dotfuscator creates updated debugging symbols (e.g., PDB files) for protected assemblies. Settings include:
- Automatically Based on Input Assemblies: For each output assembly, Dotfuscator will create debugging symbols that match the format of the input assembly's debugging symbols.
- Never: No debugging symbols will be included in the output, even if input assemblies have debugging symbols.
- Inherit Obfuscation Attributes: This option specifies whether declarative obfuscation attributes applied to types and methods should also be applied to derived types and overriding methods.
- Smart Obfuscation: This allows you to enable or disable automated renaming and removal exclusions for selected application types. See Smart Obfuscation for more details. By default, it is enabled.
- Suppress Ildasm: This tells Dotfuscator to add the
SuppressIldasmAttributeto all output assemblies which will prevent Microsoft's Ildasm utility from displaying the assembly's IL. The attribute will also prevent Visual Studio from decompiling source code using the "Navigate to Decompiled Sources" feature. This is only valid for assemblies targeting .NET 2.0 and above. - Disable [feature]: Dotfuscator allows you to enable or disable each of its transforms. The transforms that are Disabled by default in new configs include: Linking, Watermarking, Removal, and String Encryption. Transforms that are Enabled by default in new configs include Renaming, Control Flow and Injection.
- Build Progress: This controls the verbosity of Dotfuscator's output during a build.
- Investigate Only: This tells Dotfuscator to generate reports but no output assemblies.
- Use only Mono-compatible transforms: This setting disables transforms that have previously been found to cause runtime errors under the Mono runtime. Turning this option on may reduce your protection from decompilers, but helps ensure your app runs under platforms other than Microsoft's .NET. By default, it is disabled.
- All of the following options are in the Injection subsection.
Detailed descriptions of these Injection options can be found in Injection Editor, along with other information regarding Injection configuration.
- Analytics Version
- Enable Injection
- Merge Runtime
- Send Analytics Messages
- Send Debug Check Messages
- Send Shelf Life Messages
- Send Tamper Messages
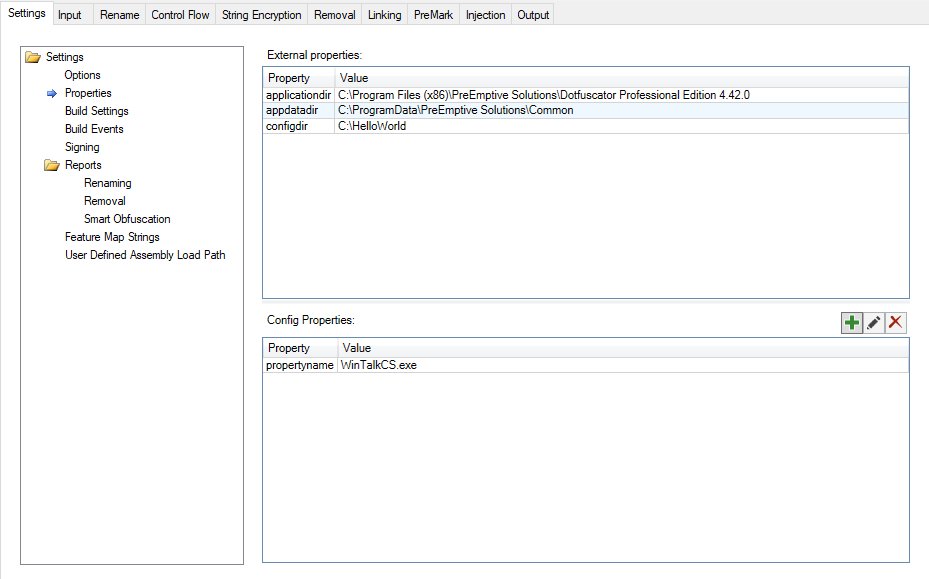
Properties
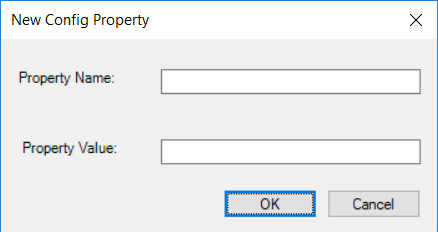
The properties editor allows you to view and add user-defined name-value pairs as Config Properties and to view External Properties that have been defined from the command line. See Property List and Properties for a full explanation. To add a Config Property, click the New button on the config properties toolbar.
This brings up the New Config Property dialog. Type in a name and a value in the fields provided. Click on the OK button, and the property will be set.
You can use the Edit and Delete toolbar buttons in a similar manner to modify or remove Config Properties.
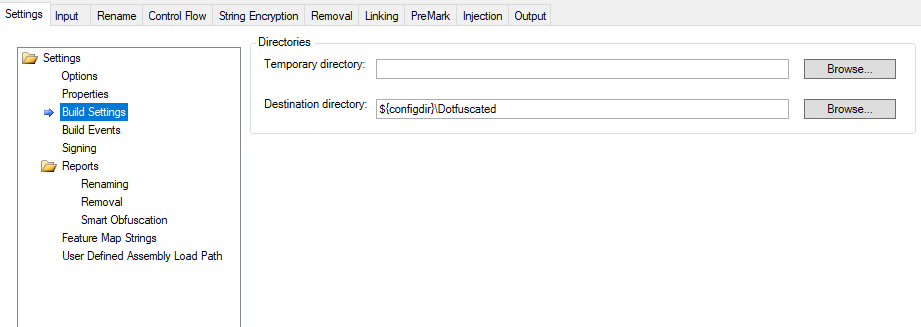
Build Settings
The build settings editor is where the config's destination directory, and optional temporary directory, are established.
When you create a new config, the output directory is set by default to ${configdir}\Dotfuscated.
The ${configdir} is a built-in property that is expanded to the folder that contains your config file.
If you want to choose a different destination directory or establish a temporary directory, enter the path to the directory in the appropriate text field.
The Temporary Directory is optional and is used to store temporary files during processing. By default Dotfuscator will use your Windows temporary directory. If you wish to specify this directory, enter the path to the directory in this field or click Browse to choose its location graphically.
The Destination Directory is required and specifies where the output from the build will reside. Enter the path to the directory in this field or click Browse to choose its location graphically.
Build Events
The Build Events property page is where you specify Build Events for your Dotfuscator config.
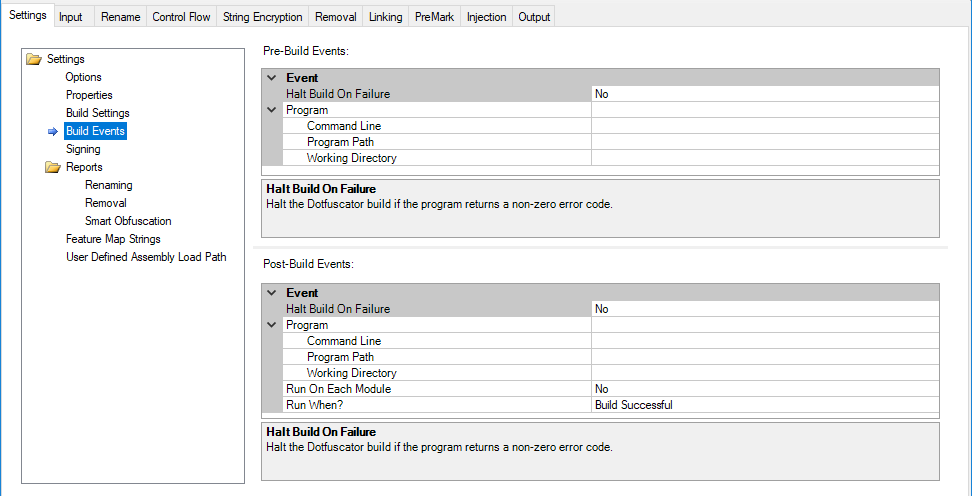
For each event you can specify an external program that runs when the event occurs. You can also specify a working directory and command line options for the program, and whether Dotfuscator should halt the build (fail) if the specified program returns a non-zero error code.
For the post-build event, you can specify under what conditions it will run (e.g. all the time, only if the build succeeds, or only if the build fails). You can also specify whether you want the post build event to run only once for the build, or run once for each output module.
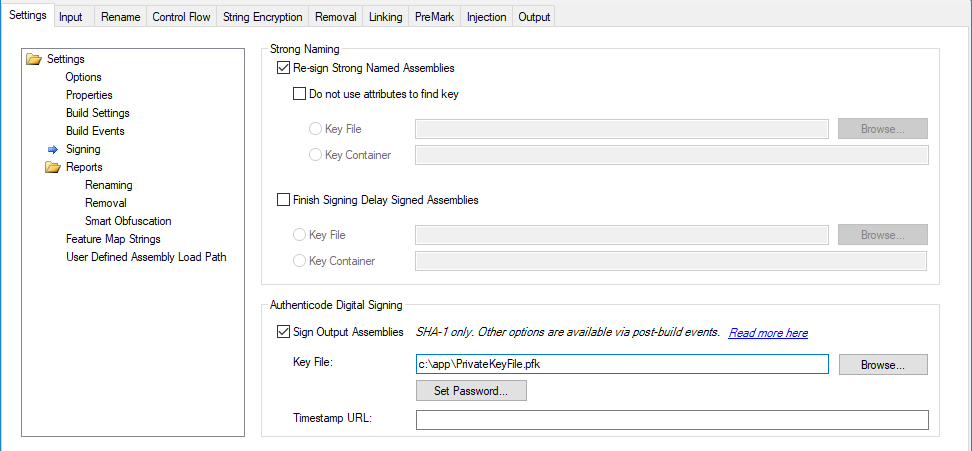
Strong Naming
The signing editor allows you to configure Dotfuscator to automatically sign or resign your strongly named assemblies. See Obfuscating Strong Named Assemblies for more information.
Strong named assemblies are digitally signed. This allows the runtime to determine if an assembly has been altered after signing. The signature is an SHA1 hash signed with the private key of an RSA public/private key pair. Both the signature and the public key are embedded in the assembly’s metadata.
Since Dotfuscator modifies the assembly, it is essential that signing occur after running the assembly through Dotfuscator.
Dotfuscator handles this step as part of the obfuscation process.
Authenticode Digital Signing
The Authenticode Digital Signing option allows you to attach an Authenticode digital signature to your application. Similar to a security certificate, this signature certifies that the application you are obfuscating and instrumenting is your intellectual property, and allows users to ensure that the resulting binaries were provided by you alone and have not been modified. This feature adds another level of security to safeguard your application. To attach an Authenticode signature to your output assemblies, check the Sign Output Assemblies checkbox and then click the Browse... button to locate your Key File, or enter its path in the text box. Once the Key File field is properly populated, click the Set Password... button to set the password for your Key File.
The Timestamp URL field provides the ability for you to specify the URL of an Authenticode timestamp service. This URL will be accessed during Dotfuscator's signing process, and will provide additional data which will allow your assemblies' Authenticode signatures to remain valid after your code-signing certificate has expired. This element is optional. If omitted, this additional data will not be included, and your assemblies' Authenticode signatures will become invalid once your code-signing certificate expires.
Reports
In addition to protected assemblies, Dotfuscator emits report files when it runs. These report files describe how Dotfuscator protected the assemblies.
We strongly recommend you archive these reports with every release (or with every build) of your app, so that you can use them at a later time. For instance, the renaming report can be used to decode obfuscated stack traces you may receive from customers using your protected app.
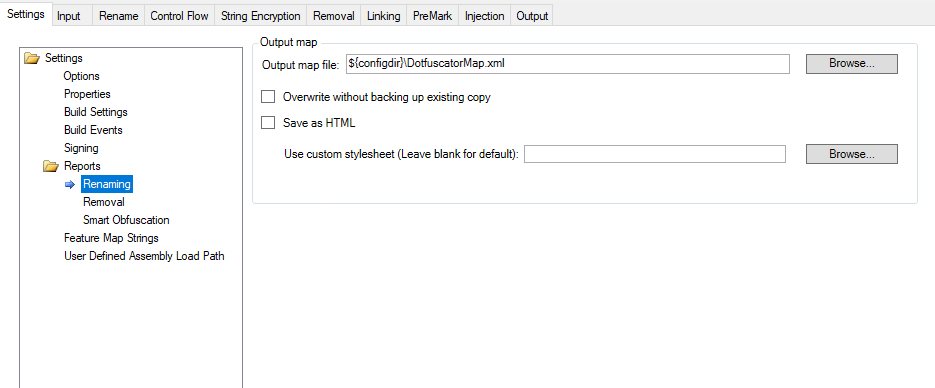
Renaming Report
The renaming report provides a summary of all the elements renamed by Dotfuscator during a specific run, including a statistics section. The Output map file section allows you to specify the location to save a renaming map file.
You also have the option of overwriting the output file each time you build the application without generating a backup of the existing copy of the output.
Dotfuscator has a default transform that can generate a readable HTML formatted version of the report in addition to the default .XML format. If you do check the Save As HTML box, the Use custom stylesheet field is activated. Leave this blank for the default custom transform or click "Browse..." to select the location of your choice.
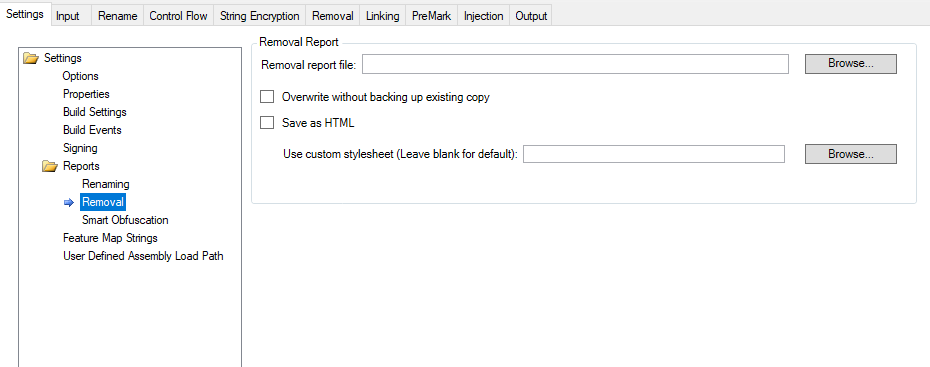
Removal Report
The removal report provides a summary of all the elements removed by Dotfuscator during a specific run, including a statistics section. The Removal Report File section allows you to specify the location to save the report.
You also have the option of overwriting the output file each time you build the application without generating a backup of the existing copy of the output. The removal report can also be written out as a readable, HTML formatted document, in addition to the XML formatted version. This report provides a quick cross reference that allows you to quickly navigate through all types, fields, and methods to see at a glance which were removed. Checking the Save as HTML checkbox tells Dotfuscator to write this report using the same name and path information as the XML version. If the default HTML report doesn't meet your reporting requirements, you can provide your own XSL document that Dotfuscator uses to transform the XML version. If you do check the Save As HTML box, the Use custom stylesheet field is activated. Leave this blank for the default custom transform or click "Browse..." to select the location of your choice.
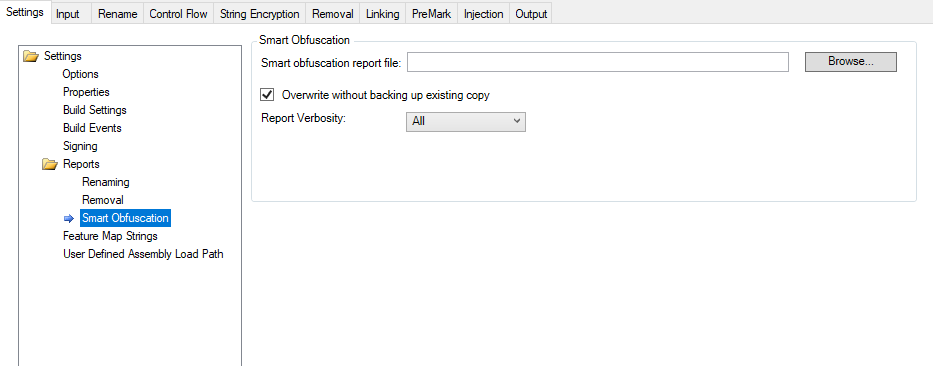
Smart Obfuscation Report
The smart obfuscation report provides a summary of all the elements that could not be renamed or removed based on rules provided by the smart obfuscation feature. If items are excluded by smart obfuscation but no destination for the report is specified, the report will appear in a Smart Obfuscation Report tab next to the Build Output tab at the bottom of Dotfuscator's window. The Smart Obfuscation Report File field allows you to specify the location to save the report.
You have the option of overwriting the output file each time you build the application without generating a backup of the existing copy of the output. You may also optionally configure the verbosity of the report. Allowed values for the verbosity attribute are All, Warnings Only, and None. The default value is All.
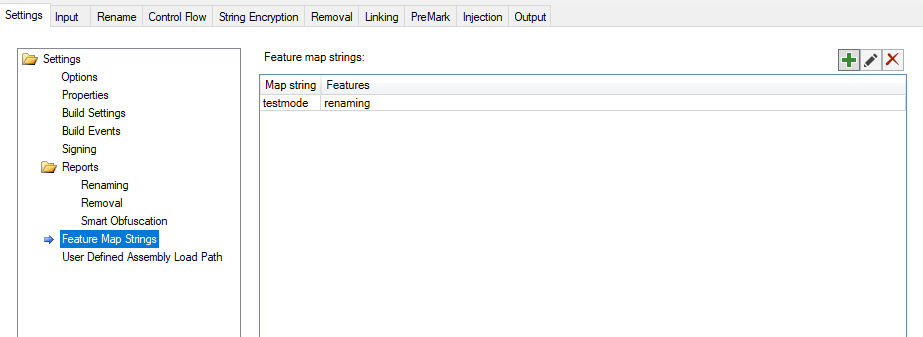
Feature Map Strings
Feature Map Strings are used in Declarative Obfuscation.
The Feature Map Editor is for mapping an arbitrary string used as the Feature property value of ObfuscationAttributes to a set of supported Dotfuscator features.
From the toolbar, you can add, edit, and remove feature map strings. The Add button brings up a dialog that allows you to map feature strings to supported Dotfuscator features.
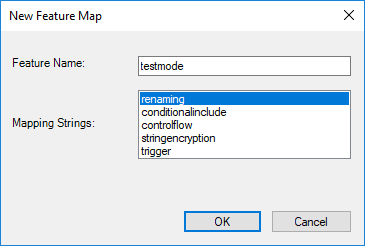
An arbitrary string chosen by the user can be entered in the Map String field.
The selected Features denote the configuration that an ObfuscationAttribute decorated with that Map String will produce.
When a feature is selected, the Edit and Delete buttons are activated. Selecting Edit brings up a dialog that allows you to edit the map feature strings to supported Dotfuscator features.
User Defined Assembly Load Path
Using this editor, you can edit your config’s user defined assembly load paths. From the toolbar, you can add or remove directories, edit existing directories, or change the order in which they are searched. When you click Add, this window displays:
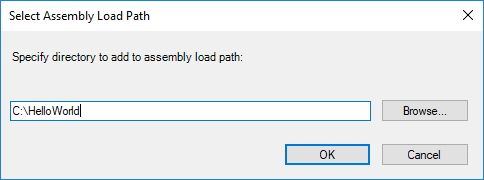
When the path is specified, click OK. The path now displays in the User Defined Assembly Load Path window:
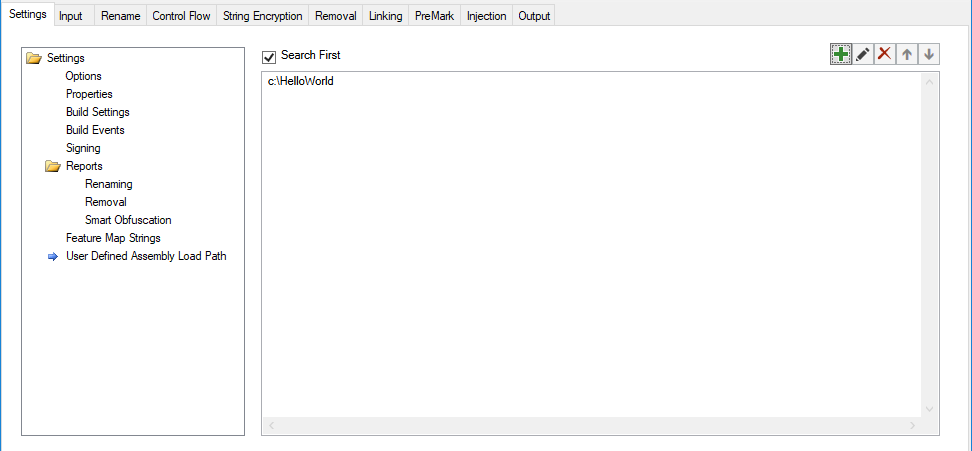
Check the Search First checkbox to have Dotfuscator search the load path before applying its standard search. When unchecked, Dotfuscator will search the loadpath only after applying its standard search.
Configuring
The Config Editor allows you to configure settings independently for each feature. Each feature has its own tab on the user interface and is fully described in the following topics:
- Renaming Editor
- Control Flow Editor
- String Encryption Editor
- Removal Editor
- Linking Editor
- PreMark Editor
- Injection Editor
Building
You can start a Dotfuscator build from the Config Editor by clicking the Build icon on the toolbar or by selecting Build > Build (Ctrl+B) from the menu. The build will use the currently loaded config file, and if there are any unsaved changes, the Config Editor will save them before running the build.
During and after the build, you can see Dotfuscator’s output in the console area.
You can cancel a build in progress by clicking the Cancel icon on the toolbar or by selecting Build > Cancel Build (Ctrl+Shift+B) from the menu.
The Output Tab
Once your application is obfuscated, you can inspect the results from the Output Tab.
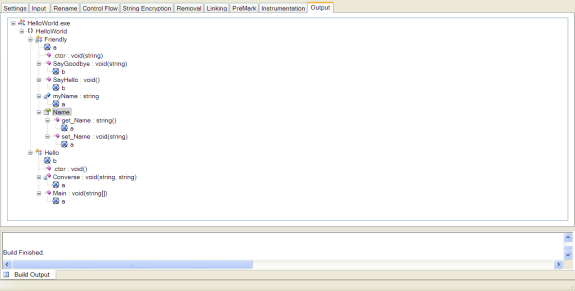
Here you can browse the tree view and see how Dotfuscator renamed your types, methods, and fields. The new names appear as child nodes under the original nodes in the tree.
You can open the output directory by clicking the Open Output Directory button on the toolbar or by selecting Build > Open Output Directory (Ctrl+E) from the menu.
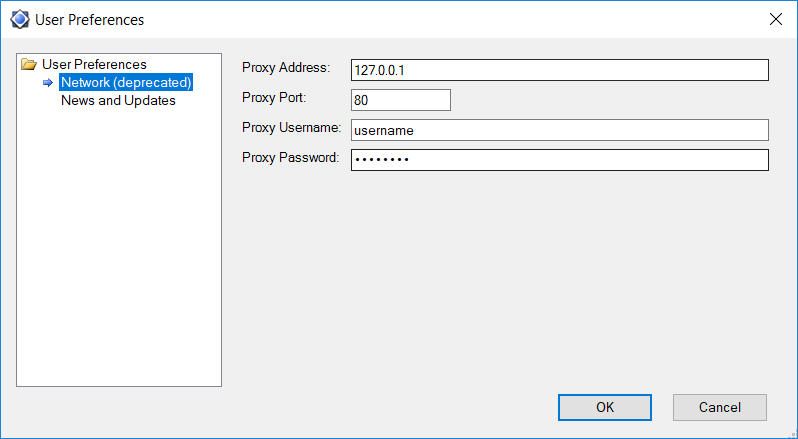
Set User Preferences
The Tools menu provides a User Preferences option. In the network section of this dialog, the configuration settings of a proxy server for network access may be entered.
In the News and Updates section of this dialog box, users may opt to allow Dotfuscator to periodically check for updates. A link to our Privacy Policy is included in this dialog.
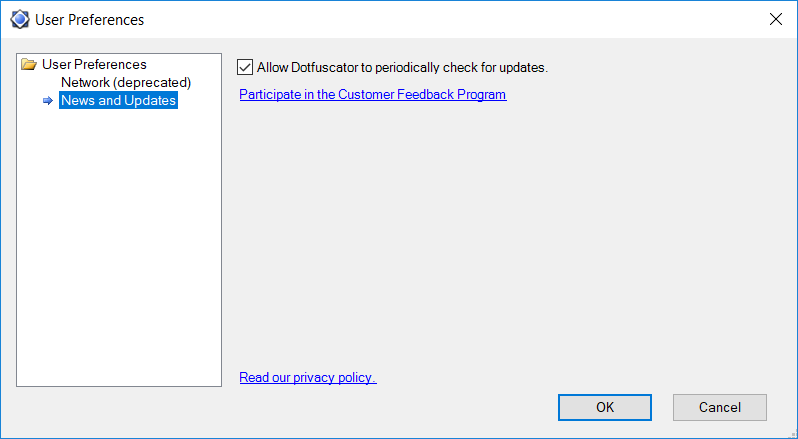
There is also a link that takes you to the Customer Feedback Program dialog. The text in the link shows your current opt-in/opt-out status. If you are concerned about privacy, click the Read our privacy policy link.
Opening the Config Editor from the Command Line
By running dotfuscatorUI.exe on the command line, you can start the Config Editor with external properties and a specific config file:
dotfuscatorUI.exe /p=outdir=c:\temp config_template.xml