Command Line Interface
Here we explain how to use Dotfuscator's command line interface. For a complete reference on the available options see the Command Line Reference page.
The command line interface is designed to allow you to:
- Run a Dotfuscator build with an existing config file, for example on a build server.
- Protect your application without requiring creation of a config file.
- Override or supplement options in an existing config file.
- Create a config file.
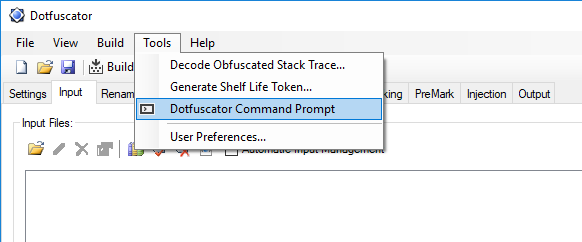
Dotfuscator Command Prompt
You can launch a command prompt that will have the command line version of Dotfuscator (dotfuscator.exe) available on the path.
If you launch this command prompt while you have a config file open in the Dotfuscator user interface, then the Dotfuscator Command Prompt's working directory will be the location of the config file.
Locating the Command Line Executable
If you need to locate the path of the Dotfuscator command line, such as for a batch script or build definition, open a Dotfuscator Command Prompt and type:
where dotfuscator
This will give the full path to the executable.
Building from the Command Line
The primary use for the Dotfuscator command line program is running a Dotfuscator build when you already have a config file. This is very easy to do:
dotfuscator config.xml
Saving a Config File from the Command Line
Once you have the command line settings that you want for your application, you can save a config file containing those settings by using the /genconfig option.
This takes all your command line options, merges them with your configuration template if you have one, and saves a custom config file that you can use for future runs.
Example:
dotfuscator -in:my.dll -keep:namespace -enha:on -cont:high -genconfig:new.xml myconfig.xml
The resulting config file (new.xml) shows the command line options merged with the options from the original configuration (myconfig.xml):
Config File:
<?xml version="1.0" encoding="utf-8" standalone="no"?>
<!DOCTYPE dotfuscator SYSTEM "http://www.preemptive.com/dotfuscator/dtd/dotfuscator_v2.2.dtd">
<dotfuscator version="2.2">
  <input>
    <asmlist>
      <inputassembly>
        <option>library</option>
        <file dir="." name="my.dll" />
      </inputassembly>
    </asmlist>
  </input>
  <output>
    <file dir="C:\MSProjects\dotfuscatortest\Dotfuscated" />
  </output>
  <renaming>
    <option>enhancedOI</option>
    <option>keepnamespace</option>
    <mapping>
      <mapoutput overwrite="true">
        <file dir="${configdir}\reports" name="MyMap.xml" />
      </mapoutput>
    </mapping>
  </renaming>
  <controlflow level="high" />
</dotfuscator>
Examples
The following examples use this config file that enables renaming with an output mapping file.
It is referenced as myconfig.xml in the examples.
Example 1:
<?xml version="1.0"?>
<!DOCTYPE dotfuscator SYSTEM "http://www.preemptive.com/dotfuscator/dtd/dotfuscator_v2.2.dtd">
<dotfuscator version="2.2">
   <renaming>
      <mapping>
         <mapoutput overwrite="true">
            <file dir="${configdir}\reports" name="MyMap.xml"/>
         </mapoutput>
      </mapping>
   </renaming>
</dotfuscator>dotfuscator -in:my.dll myconfig.xml
This command specifies my.dll as an input assembly in library mode (because of the DLL extension), and applies the renaming options in the config file.
In this case, control flow, string encryption, and removal are disabled because they are implicitly disabled in the config file.
The output DLL will go in a directory called ".\Dotfuscated", since an output is not specified in the config file or on the command line.
Example 2:
dotfuscator -in:my.dll -keep:namespace -enha:on -cont:high myconfig.xml
This command also specifies my.dll as an input assembly.
In addition, it tells the renamer to keep namespaces and use enhanced overload induction.
It also enables control flow obfuscation, setting the level to "high" for maximum obfuscation.