Protect Your App
Protecting your entire app is as simple as adding a few lines to the app's Visual Studio project file (e.g., MyExecutable.csproj).
Once integrated, Dotfuscator will protect all of your assemblies - whether from the app's project or other projects in your solution - automatically, with every Release build.
Integrate into Your Visual Studio Project
To integrate Dotfuscator into a project, edit the project file (.csproj) in Visual Studio and make the changes shown below.
(For a detailed explanation of these changes, see MSBuild Targets.)
There are two sets of changes: one for classic .NET Framework projects and the other for .NET Core and .NET Standard projects. If your app targets Xamarin or Unity, please start on those pages instead of this one.
.NET Framework
To protect a .NET Framework project, copy the new XML elements shown below (<PropertyGroup>, etc.) and paste them into your project file immediately before the closing </Project> tag.
Note that the order of the elements is important.
<?xml version="1.0" encoding="utf-8"?>
<Project ToolsVersion="15.0" xmlns="http://schemas.microsoft.com/developer/msbuild/2003" DefaultTargets="Build">

  <!-- ...existing tags... -->

  <!-- Set build properties for Dotfuscator -->
  <PropertyGroup>

    <!-- Generate a default Dotfuscator config file (DotfuscatorConfig.xml) -->
    <!-- TODO: Set this to false after the file is generated by the first local build -->
    <DotfuscatorGenerateConfigFileIfMissing>true</DotfuscatorGenerateConfigFileIfMissing>

    <!-- Enable Dotfuscator for Release builds -->
    <DotfuscatorEnabled Condition="'$(Configuration)' == 'Release'">true</DotfuscatorEnabled>

  </PropertyGroup>

  <!-- Import the Dotfuscator MSBuild targets last -->
  <Import Project="$(MSBuildExtensionsPath)\PreEmptive\Dotfuscator\4\PreEmptive.Dotfuscator.Common.targets"/>

</Project>
After editing the project file, you are ready to build the project.
.NET Core or .NET Standard
To protect a .NET Core or .NET Standard project, first remove the Sdk attribute from the project's root <Project> tag.
Then, copy the new elements shown below into the appropriate positions in your project file.
Note that the order of the elements is important.
<Project>
<!-- ORIGINALLY WAS: <Project Sdk="Microsoft.NET.Sdk">
     The Sdk attribute has been replaced with explicit <Import> tags
     to ensure Dotfuscator's targets are imported after "Sdk.targets" -->

  <!-- Import SDK properties -->
  <!-- (before any existing tags) -->
  <Import Project="Sdk.props" Sdk="Microsoft.NET.Sdk" />

  <!-- ...existing tags... -->

  <!-- Import SDK targets -->
  <!-- (after any existing tags but before Dotfuscator targets) -->
  <Import Project="Sdk.targets" Sdk="Microsoft.NET.Sdk" />

  <!-- Set build properties for Dotfuscator -->
  <PropertyGroup>

    <!-- Generate a default Dotfuscator config file (DotfuscatorConfig.xml) -->
    <!-- TODO: Set this to false after the file is generated by the first local build -->
    <DotfuscatorGenerateConfigFileIfMissing>true</DotfuscatorGenerateConfigFileIfMissing>

    <!-- Enable Dotfuscator for Release builds -->
    <DotfuscatorEnabled Condition="'$(Configuration)' == 'Release'">true</DotfuscatorEnabled>

  </PropertyGroup>

  <!-- Import the Dotfuscator MSBuild targets last -->
  <Import Project="$(MSBuildExtensionsPath)\PreEmptive\Dotfuscator\4\PreEmptive.Dotfuscator.Common.targets"/>

</Project>
After editing the project file, you are ready to build the project.
Build the Project
In Visual Studio, save your changes to the project file, close the tab, and reload the project.
To get a protected app, build the project just as you normally would, in the Release configuration.
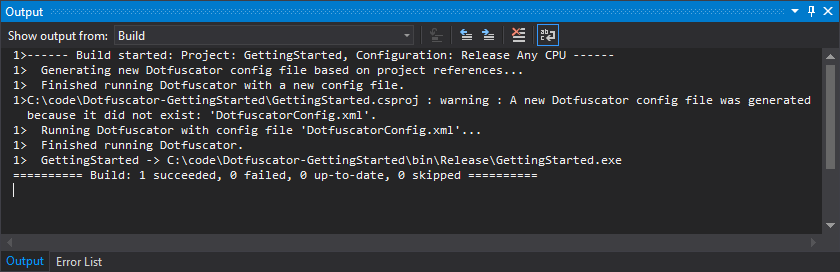
As part of this initial build, Dotfuscator will generate a config file, DotfuscatorConfig.xml, with default protection settings.
The build will emit a warning to this effect (seen in the screenshot above), which you can ignore for this first build.
Check the generated file into version control.
The build will then call Dotfuscator to protect the solution's assemblies (.exe and .dll files) in the project's output directory (e.g., bin\Release).
Dotfuscator will also produce report files in a new DotfuscatorReports directory; you should exclude this directory from version control.
Once the build completes, congratulations! Your app is now protected by Dotfuscator!
Note: For help diagnosing build or runtime issues, see Troubleshooting.
Disable Config File Generation
During the first build, Dotfuscator generated a config file, DotfuscatorConfig.xml, with default protection settings.
This feature is helpful when getting set up, but once the file exists (and is tracked by version control) you should disable this feature because it can mask a certain kind of build error.
To disable config file generation, edit your project file (.csproj) again and replace the following lines:
    <!-- Generate a default Dotfuscator config file (DotfuscatorConfig.xml) -->
    <!-- TODO: Set this to false after this file is generated by the first local build -->
    <DotfuscatorGenerateConfigFileIfMissing>true</DotfuscatorGenerateConfigFileIfMissing>
with:
    <!-- Error if the Dotfuscator config file (DotfuscatorConfig.xml) is missing -->
    <DotfuscatorGenerateConfigFileIfMissing>false</DotfuscatorGenerateConfigFileIfMissing>
Examine the Protected Assemblies
After integrating Dotfuscator into your project, you should verify that the integration is operating correctly. You might also be curious about what kind of protection Dotfuscator is applying by default.
The easiest way to answer these questions is to use reverse engineering tools on your project's assemblies, decompiling them back into high-level C# code.
You can decompile assemblies built locally (e.g., in bin\Release) as well as those laid down by your app's installer.
For full details of how to decompile assemblies, see Decompiling.
As an example, consider decompiling a method in the GettingStarted sample app before and after integrating Dotfuscator:
| Unprotected | Default protection (excerpt) |
|---|---|
 |
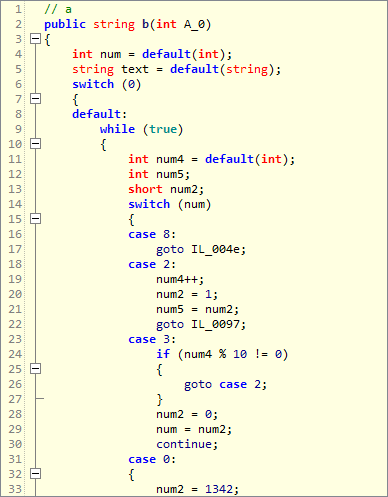 |
We can clearly see what the unprotected method is doing, as well as its name, just as if we had the source code.
However, with Dotfuscator's default protection, the simple for loop has been converted into a confusing mess of switch and goto statements by Control Flow obfuscation.
Additionally, the name of the method and its defining type have been replaced with short, meaningless names thanks to Renaming obfuscation.
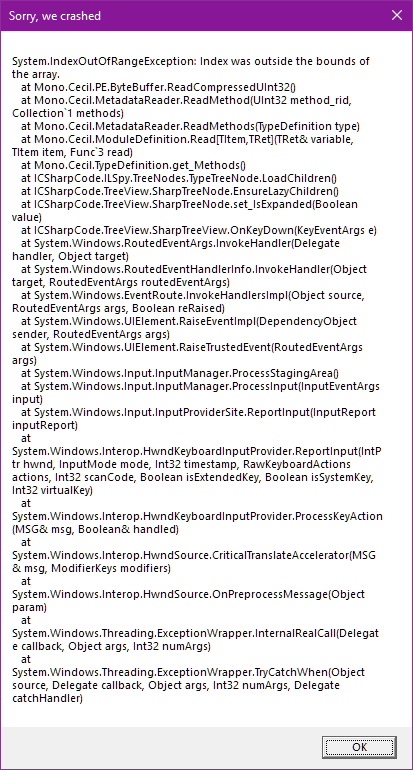
Note that this is just the default protection Dotfuscator provides. With some additional configuration, Dotfuscator can cause decompilation tools to outright crash when processing your assemblies:
| Default protection (excerpt) | Enhanced protection |
|---|---|
|
 |
Dotfuscator can also inject Checks into your app, which detect and respond to unauthorized usage at runtime. For instance, a Debugging Check can detect if a debugger is attached to your production app and, if so, terminate the app.
For details on configuring these and other stronger forms of protection, see Enhance Protection.
Archive Report Files
As part of the build, Dotfuscator produces report files (in the DotfuscatorReports directory).
These reports contain information that can be useful when testing, releasing, and supporting a protected app.
For instance, the renaming map file (Renaming.xml) enables you to decode obfuscated stack traces produced by the app.
You should archive these reports, especially for builds you release. This way, if you later run into an issue with a certain version of your app, you will have the corresponding report files to assist you.
If your team uses a continuous integration and delivery (CI/CD) pipeline or other automated build system, configure it to archive the contents of the DotfuscatorReports after every build.
Otherwise, make a note in your release process or checklist to manually archive this directory when releasing the app.
Be sure to store the reports in a secure, versioned location so you can refer to them later.
Note: These report files can undo parts of Dotfuscator's protection. Never distribute them outside of your organization.
Enhance Protection
Dotfuscator offers default protection settings when you first integrate it into a Visual Studio project, as demonstrated earlier. These settings are chosen to give your app reasonably-strong protection without requiring you to perform additional configuration, and to reduce the risk of protection interfering with your app's normal operation.
However, Dotfuscator offers much stronger protection than these defaults. For details, see the Enhance Protection page.
Alternative Approaches
This page demonstrated a recommended approach for using Dotfuscator, where the protection is applied by Dotfuscator's MSBuild targets. For some scenarios, this approach may not be suitable. An alternative approach may be better if any of the following are true:
- You need to protect assemblies that don't originate from your solution.
- You need to use Dotfuscator's Linking feature.
- You need Dotfuscator to run after the MSBuild packaging steps.
- Your project is built by a build system other than Visual Studio or MSBuild.
- You don't have access to the Visual Studio project itself, just the already-compiled assemblies (i.e.,
.exeand.dllfiles) or app package (e.g.,.appx).
In these cases, you will need to create a Dotfuscator config file yourself using the Config Editor. You will explicitly specify which assemblies Dotfuscator will protect and where the protected versions will be written; for details, see Working with Configs.
Once the Dotfuscator config file is set up, you will then need to call Dotfuscator during your build.
If you are using and are familiar with MSBuild, you can use the Dotfuscate task to call Dotfuscator from a custom build target.
Alternatively, the Command Line Interface can be used from any build system or script in any scenario Dotfuscator supports.