PreEmptive Protection - Dotfuscator 4.33
User Guide
The Injection Editor
The Injection screen is used to configure Dotfuscator code injection which includes Checks and Instrumentation features.
From Dotfuscator's standalone user interface, you can access this screen by selecting the Injection tab. From Dotfuscator's integrated Visual Studio interface, you can access this screen by selecting Injection from the Configuration Options folder in Solution Explorer.
This screen contains the Instrumentation tab and the Checks tab.
While not accessible from this screen, there are also general settings and input assembly settings that affect how Injection will behave and whether it is turned on at all.
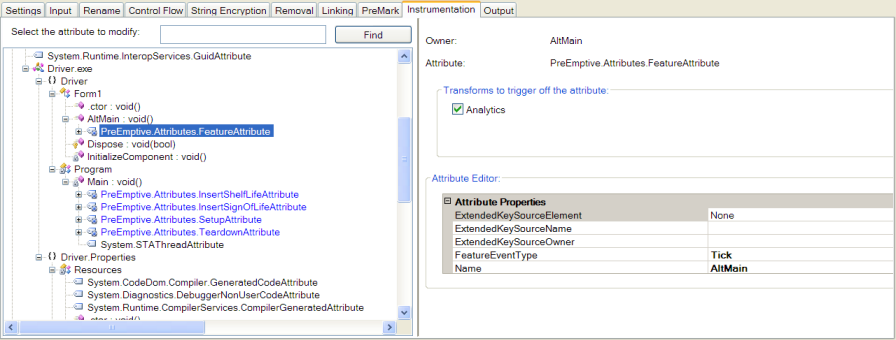
Instrumentation Tab
The Instrumentation tab allows you to add, edit, and review the attributes that configure Dotfuscator's Instrumentation features.
This tab displays a tree view of the input assemblies, including the instrumentation attributes (which can be edited) that decorate each assembly or method.
Note: For new projects, the default setting for instrumentation injection is enabled. However, telemetry is disabled by default. See General Injection Options for how to change these settings.
The tab is divided into two sections. The left side presents the structure of your input assemblies in a code tree, including the instrumentation attributes that annotate each assembly or method. Selecting one of these attributes will display the attribute's properties on the right side of the tab, allowing for the attribute's configuration.
Defining Instrumentation Attributes from the GUI
In addition to specifying attributes in your source code, you may also add attributes to your project from the user interface. These attributes will be saved in the Dotfuscator config file, not in your source code. These attributes are known as extended attributes.
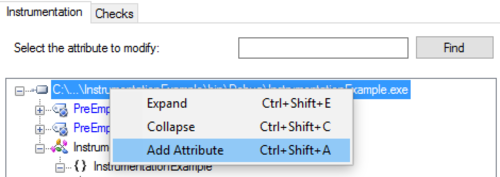
To add an extended attribute:
In the code tree, select the assembly or method that you wish to annotate.
Right-click the selected item and choose Add Attribute.
Select the appropriate attribute from the list of available attributes and click OK.
The extended attribute is added as a child of the item, listed in blue text. Expand the item's subtree and select the newly-added attribute.
The right side of the tab now displays the properties of the attribute. You can edit these properties in this table.
For instance, a BusinessAttribute can be added to an assembly by right-clicking the assembly in the left-hand side tree view, selecting Add Attribute, and choosing PreEmptive.Analytics.BusinessAttribute.
The attribute's CompanyName property can be configured by selecting the attribute in the tree view, then modifying the CompanyName entry in the right-hand side property view.
To edit an extended attribute:
Select the attribute within the code tree (optionally by using the search functionality).
The Attribute Editor on the right side of the screen can be used to edit the selected attribute's various properties.
You can remove an extended attribute from the project by right-clicking on the attribute in the code tree and choosing Remove Attribute.
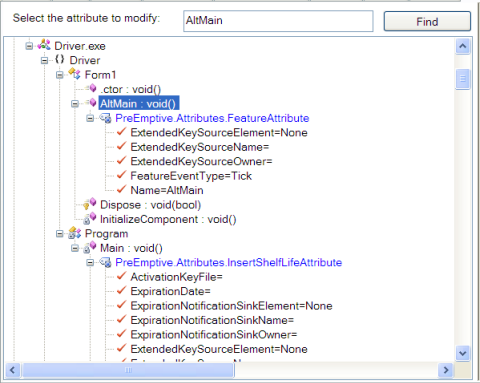
Attribute Search Field
The Instrumentation tab is enabled with a Find feature that enables you to locate any item in the instrumentation tree view. For example, you can find a SetupAttribute by typing the text "*Setup* " (without quotes) and clicking the Find button.
Working with In-Code Instrumentation Attributes
The Instrumentation tab also displays instrumentation attributes specified in your source code. When working with these in-code attributes, there are a few things to keep in mind:
In-code attributes will be displayed in the code tree in black text. Extended attributes will be displayed in blue text.
You can override an in-code attribute with an extended attribute. Dotfuscator will then ignore the in-code attribute and not display it in the code tree. The extended attribute will be used instead. Overriding happens when either of the following occurs:
You edit the properties of an in-code attribute via the GUI. Because Dotfuscator does not access the source code, this causes an extended attribute to be created with the changed values.
You add an extended attribute to an assembly or method that already has an in-code attribute of the same type.
If you remove an extended attribute that was overriding an in-code attribute, the in-code attribute will once again take effect.
You cannot remove in-code attributes using the Dotfuscator UI. If you wish to remove such an attribute, you must remove it from the source code itself.
Checks Tab
The Checks tab allows you to add, edit, and remove Checks.
This tab displays a table listing all of the Checks that are configured in the current Dotfuscator config file and any Checks that may be configured via custom attributes in the input assemblies.
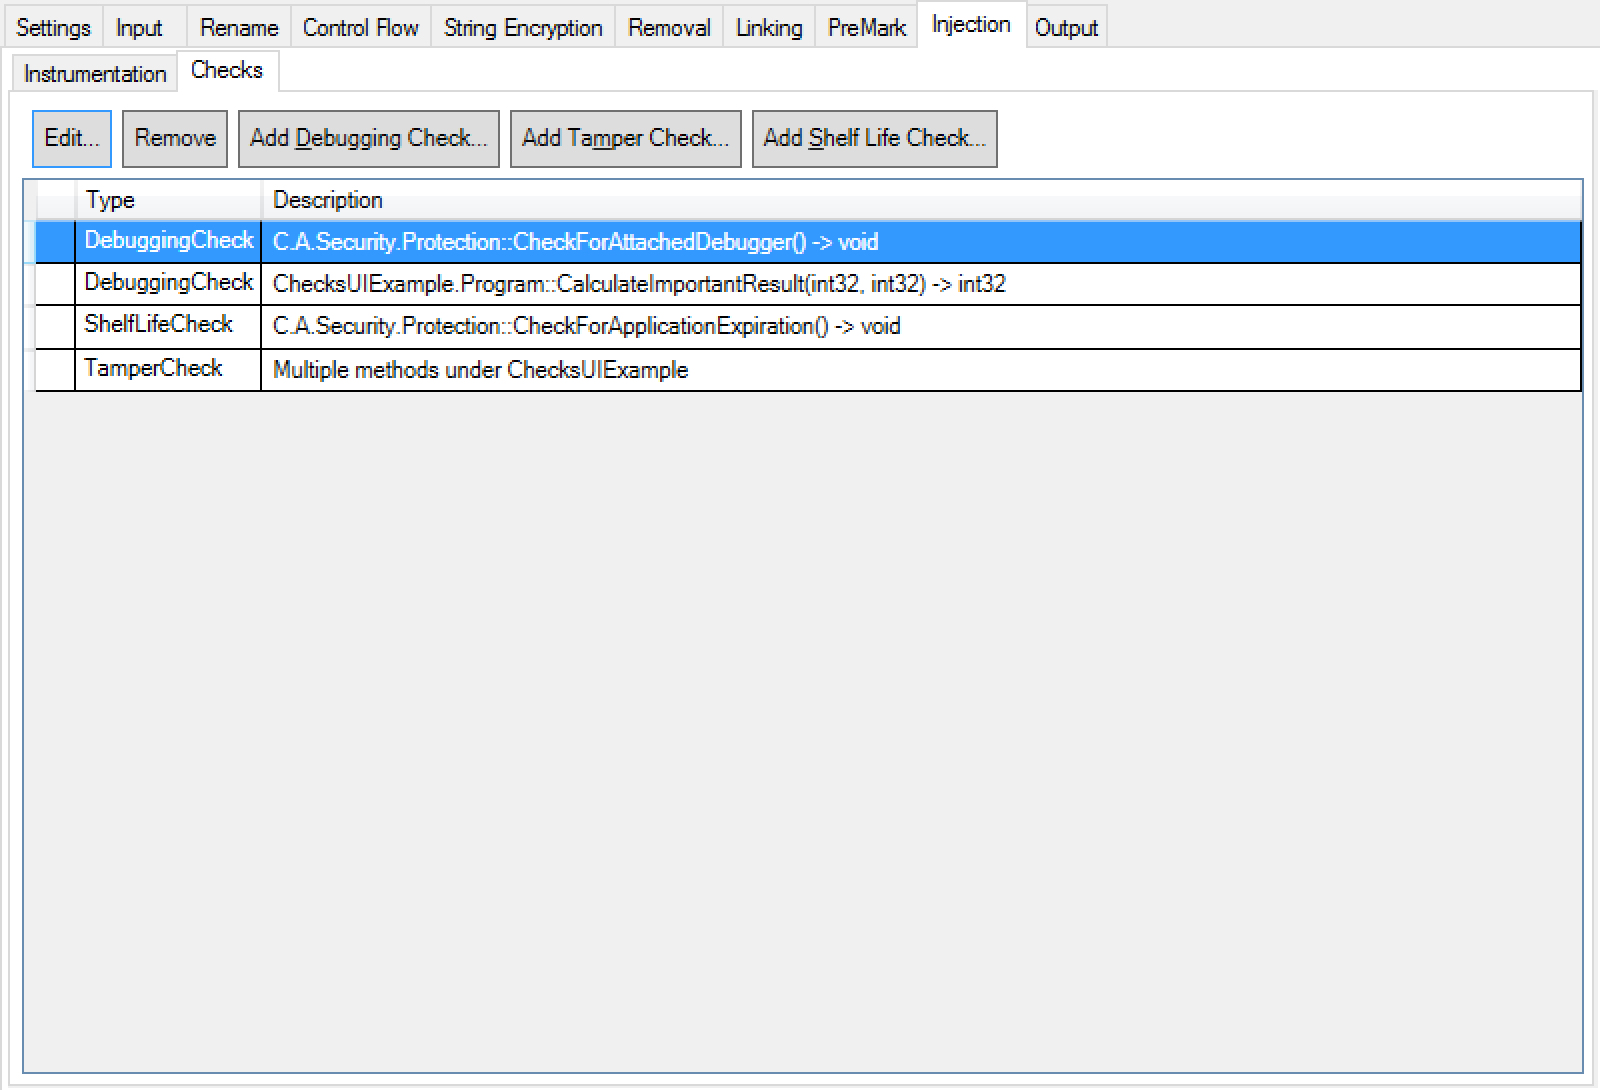
Table Columns:
The first column only shows icons if you are using in-code attributes to define Checks.
The Check Type column indicates which of the possible Check Types this Check is.
The Description column describes the locations in the input assemblies that have this Check.
- Method signatures in this column are abbreviated, and only the common namespace is displayed if there is more than one location for the check. To see a full, unabbreviated listing of these method signatures, you can look at the tool tip for the Check's description.
Defining Checks in the GUI
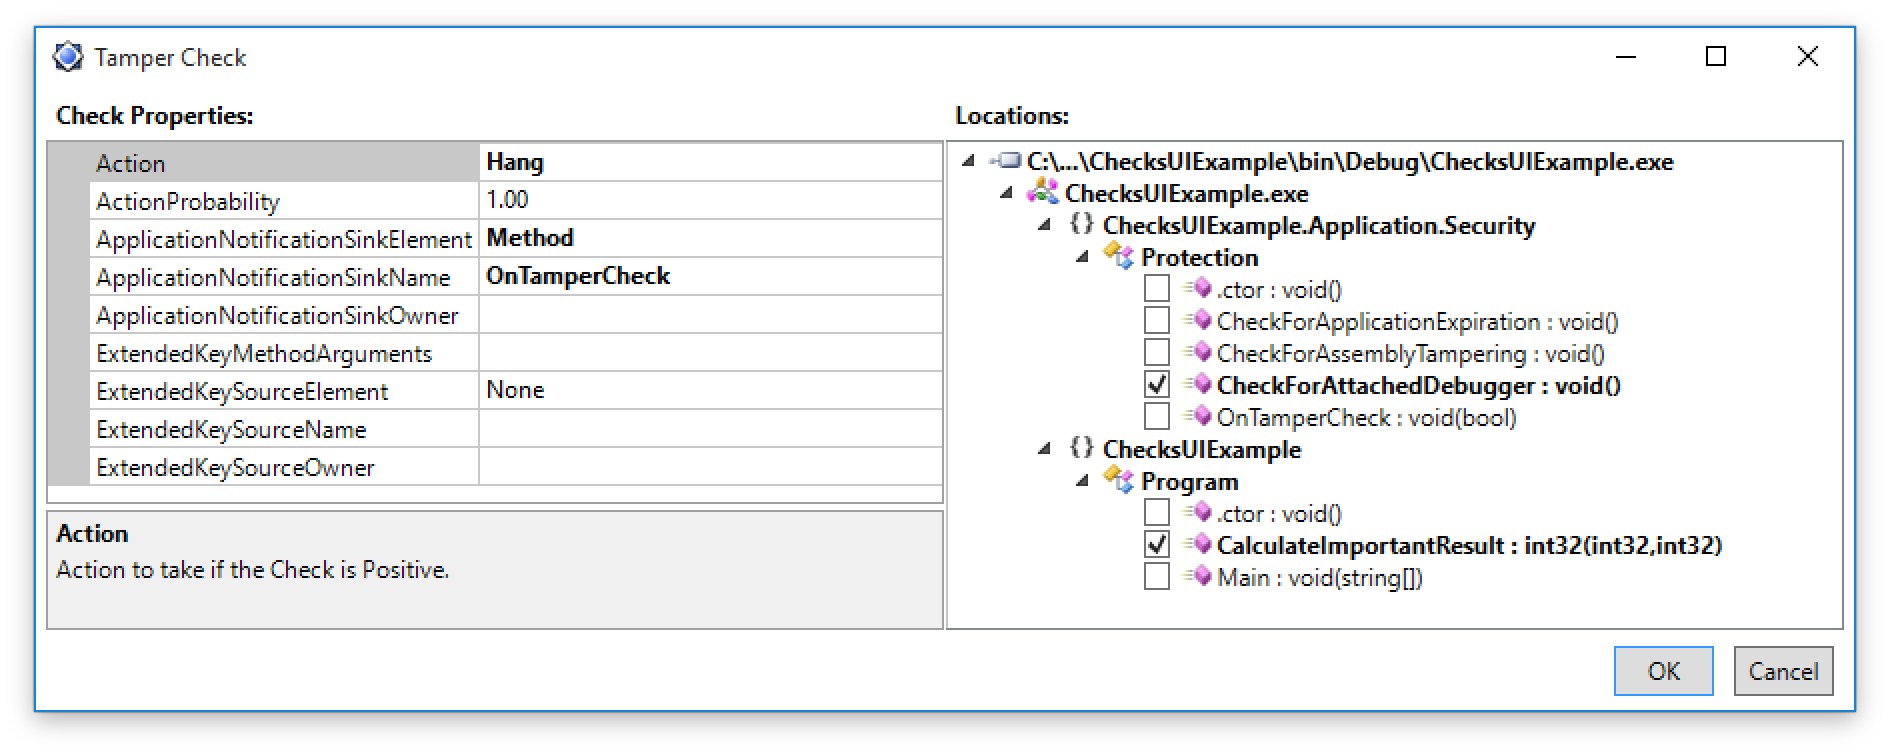
To add a Check:
Click the button that corresponds to the type of check you want to create: Add Debugging Check..., Add Tamper Check..., or Add Shelf Life Check.... An editor for the new Check will open.
In the grid on the left side of the editor, configure the properties for your Check. See the section on Property Editing for more detailed instructions.
In the code tree on the right side of the editor, select the Locations in your input assemblies that you wish to be injected with this Check. Each location can only be associated with one Check of a particular check type.
Click OK to save. A new row in the table will appear for the Check.
You can edit a Check by highlighting the Check in the table and then clicking the Edit button. The Check's editor will open, and you can edit its properties as well as change its locations.
You can remove a Check from the project by highlighting the Check in the table and then clicking the Remove button.
Working with Checks Defined by In-Code Attributes
The Checks tab also displays check attributes specified in your source code. When working with these in-code attributes, there are a few things to keep in mind:
You can override an in-code attribute-defined Check with a user interface-defined Check. Dotfuscator will then ignore the in-code attribute and will not represent it with its own row in the table of Checks. The user interface-defined Check will be used instead. Overriding happens when either of the following occurs:
You edit the properties of or add a location to an in-code attribute-defined Check via the GUI. Because Dotfuscator does not access the source code, this causes a user interface-defined Check to be created with the changed values and/or additional locations.
You add a location to a user interface-defined Check such that the location already has an in-code attribute of the same Check Type.
If you remove a user interface-defined Check that was overriding an in-code attribute, the in-code attribute will once again take effect.
You cannot remove in-code attributes using the Dotfuscator UI. If you wish to remove a Check defined by an in-code attribute, you must remove it from the source code itself.
The first column of the Checks table will display icons if you are using in-code attributes to configure Checks:
No icon is displayed if the Check was added from the user interface and does not override a Check defined by an in-code attribute.
 is displayed if the Check is fully specified by an in-code attribute.
 is displayed if the user interface-defined Check overrides at least one in-code attribute.
Editing Properties
Modifying properties of instrumentation attributes and checks is usually straightforward; the supported fields will accept free text (for most string properties), provide a drop-down list of supported values, or provide a date picker.
However, some properties, when selected, will also display a "..." icon. Clicking it will display an additional editor for populating the field. These editors are described in the following subsections.
In addition, there are property listing documentation pages that explain what each of the specific properties means and what behavior it controls.
Endpoint Selection Dialog
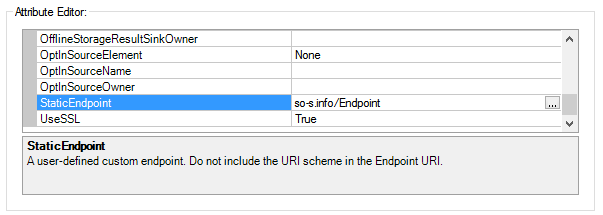
On the StaticEndpoint property of a SetupAttribute, clicking the "..." icon will open the following dialog:
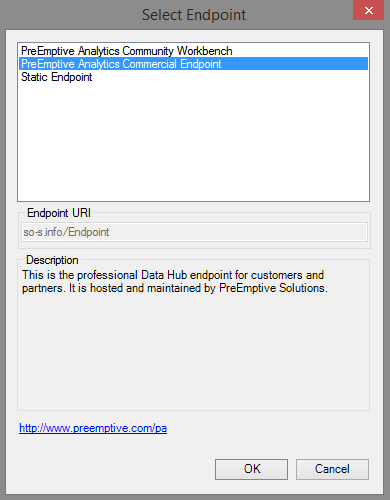
From here, you can choose one of PreEmptive Solutions' predefined endpoints or specify your own URL. Once you've made your selection and clicked OK, the location displays in the StaticEndpoint field:
Owner Type Selection Dialog
An Owner property of sources and sinks, such as ExtendedKeySourceOwner, specifies a type within the project. Click the "..." icon in the field to launch the dialog from which you can select the type.
GUID Generator
On various Guid properties and the CompanyKey property of a BusinessAttribute, clicking the "..." icon will generate a new GUID for the property.
Browse Dialog
On the ActivationKeyFile property of a ShelfLifeCheckAttribute or a SignOfLifeAttribute, clicking the "..." icon will allow you to browse to and select a Shelf Life Activation Key.
Similarly, this dialog can be invoked to browse to and select a PrivateKeyFile for a ShelfLifeCheckAttribute.
Generate New Shelf Life Token
When using Shelf Life Checks with an externally stored Shelf Life Token, Dotfuscator allows you to generate new Shelf Life Tokens easily by clicking View > Generate New Shelf Life Token... in the menu bar of Visual Studio or by clicking Tools > Generate Shelf Life Token... in Dotfuscator.
Within the dialog box that displays, you can browse to and select the appropriate Shelf Life Activation Key file and, optionally, a PKCS #12 Private Key file to provide additional validation of the Shelf Life Token. When using a private key file, enter the correct password in the Private Key File Password field.
Set the Expiration Date and optionally set the Warning Date.
Next to the Warning Date field is the Use Warning Date checkbox.
Clear this check box if you did not enable Warning Date behavior using the ShelfLifeCheckAttribute during instrumentation, or if you enabled it during instrumentation but wish to provide an updated Shelf Life Token that disables it.
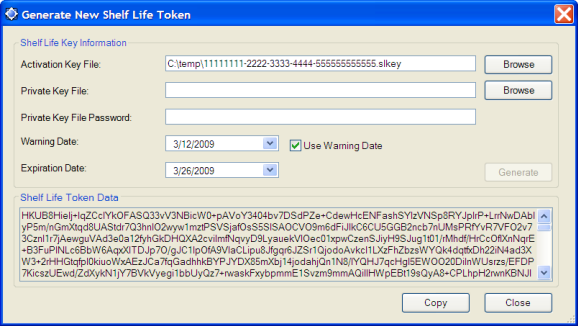
When the Shelf Life Key information is determined to be valid, the Generate button is enabled. Clicking this button generates a new Shelf Life Token that can be used in your Shelf Life-instrumented application. The Shelf Life Token Data can be copied to the clipboard by clicking the Copy button.
General Injection Options
General Injection options are available on the Settings Tab > Global Options property page in the standalone user interface. From within Visual Studio, the Global Options property page is available from the Dotfuscator project's properties dialog. These options are located in the Injection subsection.

There are several options available:
Analytics Version: Determines the internal Analytics API used for injection. Normally, you should not have to adjust this setting from the default provided, unless directed by PreEmptive Solutions support.
Enable Injection: Acts as a master switch for the entire injection process. If checked, injection will be performed as specified by the injection settings configured in Dotfuscator as well as by all instrumentation attributes and check attributes contained within the input assemblies. If unchecked, no injection of any kind will occur.
- Even if injection is disabled, Dotfuscator will still honor each input assembly's Strip Injection Attributes option which is an assembly-level injection option.
Merge Runtime: Causes the Analytics API code to be injected into an existing input assembly, rather than being put into a separate assembly. For more details about the behavior this option controls, see the Analytics API section of the Instrumentation Overview.
Send Analytics Messages: Enables the injected app to transmit Instrumentation Telemetry.
This setting must be enabled in order to track sessions, features, exceptions, and system metrics.
If you want to use Instrumentation attributes only for the purpose of setting up Check Telemetry, you may disable this option.
Send Debug Check Messages: Enables the injected app to transmit Check Telemetry from Debugging Checks.
- If disabled, Debugging Checks and their associated Check Actions still occur.
Send Shelf Life Messages: Enables the injected app to transmit Check Telemetry from Shelf Life Checks.
If disabled, Shelf Life Checks and configured exit behaviors still occur.
This option also controls the message sent by the
SignOfLifeAttribute.
Send Tamper Messages: Enables the injected app to transmit Check Telemetry from Tamper Checks.
- If disabled, Tamper Checks and their associated Check Actions still occur.
Assembly-level Injection Options
Dotfuscator allows granular control of the handling Instrumentation attributes and Check attributes on your assemblies. You can tell Dotfuscator whether to honor or ignore and whether to keep or remove these attributes from the assemblies. These settings can be applied at the assembly level.
From within Visual Studio, the assembly-level options are available on the properties tool window when an input assembly has the focus.
From the standalone user interface, the assembly-level options are available on the Input tab.
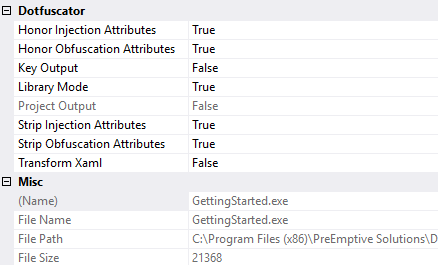
Honor Injection Attributes
Set Honor Injection Attributes to "True" (the default) to tell Dotfuscator to process these attributes and perform the indicated injection on the target assembly. Setting the property to "False" tells Dotfuscator to ignore any Instrumentation or Check attributes.
A "False" setting is useful in testing scenarios and in advanced scenarios where a set of assemblies may need to be run through Dotfuscator multiple times.
Strip Injection Attributes
Set Strip Injection Attributes attributes to "True" (the default) to tell Dotfuscator to remove these attributes from the target output assembly. Setting this property to "False" tells Dotfuscator to leave the attributes in the output assembly.
Like the Honor Injection Attributes option, a "False" setting is useful in testing scenarios and in advanced scenarios where a set of assemblies may need to be run through Dotfuscator multiple times.
The table below indicates the results when combining these two options and why you might want to use each combination:
| Honor Injection Attributes | Strip Injection Attributes | Notes |
|---|---|---|
| True | True | Default settings. The assembly is injected with code based on attributes declared in the assembly, and these attributes are removed. |
| False | True | The assembly is not injected with code based on attributes declared in the assembly, and these attributes are stripped out. This is useful for creating test builds that do not include Checks or Instrumentation functionality. |
| True | False | The assembly is injected with code based on attributes declared in the assembly, and these attributes are left in. This combination is not recommended. |
| False | False | The assembly is not injected with code based on attributes declared in the assembly, and the attributes are left in. This is useful for assemblies that need to be obfuscated but will need to have Checks or Instrumentation features added in a subsequent step. |
See Also:
- Understanding Checks
- Understanding Instrumentation
- Check Attribute Listing
- Instrumentation Attribute Listing
- The Settings Tab in the standalone user interface
- Project Properties in Visual Studio
Dotfuscator Version 4.33.0.6680. Copyright © 2017 PreEmptive Solutions, LLC