PreEmptive Protection - Dotfuscator 4.33
User Guide
The Linking Editor
The Linking editor provides easy drag and drop functionality that allows you to quickly map your input assemblies to one or more output assemblies. You can then configure the linker for each output assembly.
Note: For new projects, the default setting for the Linking transform is Disabled.
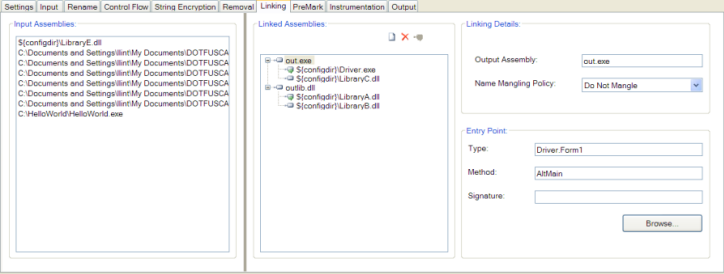
Input Assemblies and Linked Assemblies
To create and configure an output assembly for linking, follow these steps.
- Click the Create New Assembly button on the Linked Assemblies toolbar. An entry for your new assembly appears on the linked assemblies list.
- Give your new output assembly a name by typing it in the Output Assembly field in the Linking Details section. You do not have to type path information; like all output assemblies, it will be written to the destination directory.
- Select the assemblies you want to link from the Input Assemblies list and drag them to the new assembly in the Linked Assemblies list. They will disappear from the Input Assemblies list and appear as child nodes of the new assembly.
- Right click on the input assembly that you wish to mark as your prime assembly and select Set Primary Assembly from the context menu. You can also do this by selecting the prime assembly and using the toolbar button. Prime assemblies are indicated with a tag icon.
- If needed, set the Name Mangling Policy and Entry Points for the new assembly.
- Repeat the process for each output assembly you want to create.
You can remove an assembly from the Linked Assemblies list by selecting it and using the delete button on the toolbar or by pressing the Delete key.
The screenshot below shows an example with multiple linked outputs. First, input assemblies Driver.exe and LibraryC.dll are linked into out.exe; next, LibraryA.dll and LibraryB.dll are linked into outlib.dll; and last, LibraryE.dll "passes through" without being linked.
Prime Assemblies
When you set up linking, you must specify one of the input assemblies as the prime assembly. Dotfuscator applies the manifest information (e.g. version number, public key, etc.) contained in the prime assembly to the newly created output assembly.
Name Mangling
When the linker is merging assemblies, the linker sometimes encounters situations where a name needs to be changed in order to prevent a naming collision. For example, if two of the input assemblies contain private classes with identical names then the linker must change one of the names in order to merge the assemblies.
In most cases, Dotfuscator can safely mangle names (when at least one of the original names is not visible outside its assembly); however, if Dotfuscator sees a case in which there are two visible types with the same name, it cannot safely mangle either name without guidance. It is only in this case where the name mangling policy is used. The default is to halt the build with an error message. Other options are to mangle one of the names and issue a warning, or silently mangle the names.
Setting Entry Points
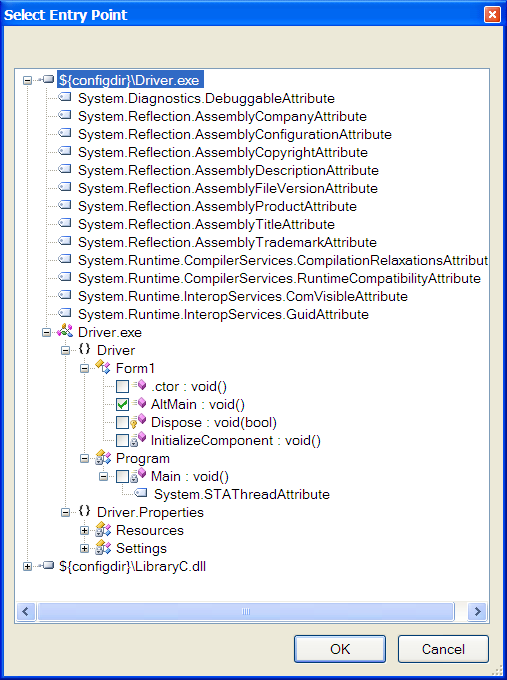
If you need to set an entry point for your linked output assembly, you can use the Select Entry Point dialog by pressing the Browse button in the linking editor’s Entry Point section.
This dialog shows a graphical view of the all the methods that will be available in the linked output assembly. Checking a method selects it as an entry point. The dialog will fill in the rest of the information in the Entry Point section.
Entry Points
In .NET, an executable assembly must have a method marked in the metadata as the entry point (typically this method is called Main, but it can have any name.).
This is the method that the CLR calls when the assembly is run.
In some cases you need to specify an entry point for each linked output assembly.
The table below summarizes the rules for entry points.
| Inputs | Output | Entry Point Rule |
|---|---|---|
| All are EXEs | Is an EXE | A user specified entry point is required. The linker will remove all entry points on input assemblies and apply the user specified entry point to the output assembly. |
| All are DLLs | Is an EXE | A user specified entry point is required. |
| Mixed EXEs and DLLs | Is an EXE | A user specified entry point is required, except if there is only one input exe; in which case the linker will use its entry point. A user specified entry point will override the default. |
| Anything | Is a DLL | A user specified entry point is not used. The linker will remove all entry points on inputs. |
Dotfuscator Version 4.33.0.6680. Copyright © 2017 PreEmptive Solutions, LLC