PreEmptive Protection - Dotfuscator 4.33
User Guide
The Rules Editing Interface
The Dotfuscator Graphical User Interface uses a common interface to graphically specify rules for including and excluding elements in your application. The rules editing interface is used to set rules for the following operations:
- Renaming exclusion rules
- Control Flow exclusion rules
- String Encryption inclusion rules
- Removal Trigger Method selection rules
- Removal Conditional Includes selection rules
This section explains how to get the most out of the rules editing interface.
There are two methods of creating rules. The first is by checking individual elements in the application tree view. By doing this, you generate a simple rule that selects that particular element. The second method is by adding “nodes” to the rule editing view. This type of rule is more powerful and customizable. You can use regular expressions and other selection criteria, based on the type of rule. This method also provides ways to preview the items selected by each rule.
Selecting Individual Elements
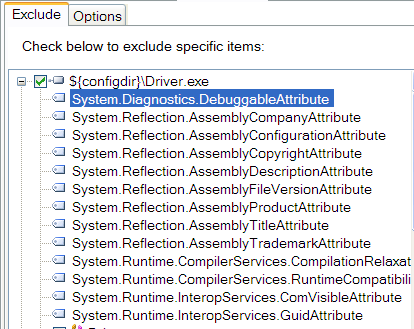
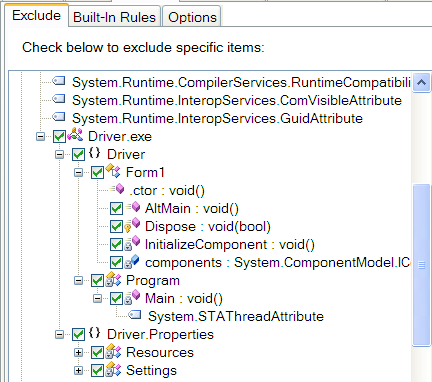
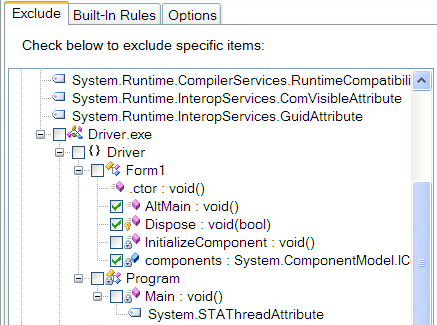
You can create selection rules for individual elements by simply checking the box next to the item in the application tree view. You can check assemblies, modules, types, methods, and fields in this manner.
Assemblies
The top-most nodes in the application tree view represent the packages or assemblies. If you check an assembly node, all child nodes become checked. This reflects the fact that selecting an assembly means that you are selecting all items contained in that assembly: modules, types, and their members.
Modules
The nodes immediately below an assembly node in the application tree view represent the modules that make up the assembly (in most cases there is one module per assembly). If you check a module node, all child nodes become checked. This reflects the fact that selecting a module means selecting all items contained in that module: "global" methods and fields, types, and their members.
Namespaces
Namespace nodes are child nodes of module nodes in the application tree view. If you check a namespace node, all child nodes become checked. This reflects the fact that selecting a namespace means selecting all items contained in that namespace: types and their members.
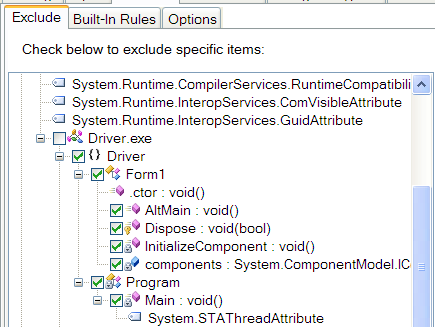
Types
Type nodes appear under module or namespace nodes. Nested types are represented at this same level, with a name prefixed with the parent type name(s) delimited with the '/' character. If you check a type node, one of two things happens, depending on what type of rule you are creating.
If you are creating a renaming exclusion rule, child nodes remain unchecked. This reflects the fact that types are selected independently of their members for renaming exclusion rules. Checking a type node will generate a rule that excludes just the type name from renaming.
If you are specifying any other kind of rule, all child nodes will also become checked. This reflects the fact that in these cases, selecting a type means that you are in fact selecting all members defined by that type.
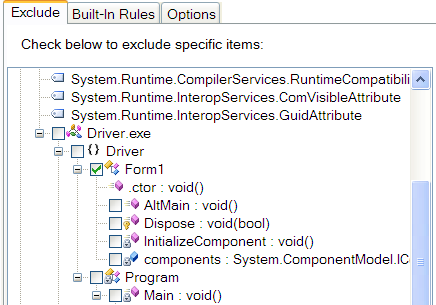
Members
Members can be methods, fields, properties, or events. Member nodes can appear under module nodes in the case of "global" members; more commonly, they appear under type nodes. Checking a member node will generate a rule that selects that member.
Creating Custom Rules
You can create custom rules by adding nodes to the rule editing view. Depending on the type of rule, you can attach regular expressions and/or other selection criteria to the rule. Once the rule is configured, you can preview its effects by right clicking on the node and selecting Preview from the menu. Items selected by the rule will be shaded in the application tree view. Each type of rule is covered in the following sections.
Selecting By Namespace
A namespace rule will select all types and their members in matching namespaces.
Namespace Name
You create a namespace rule by clicking the Add Namespace button, then typing a name in the Name field. The name will be interpreted as a regular expression if the Regular Expression checkbox is checked; otherwise the name will be interpreted literally (and thus will match at most one namespace).
Namespace Rule Node
The corresponding node displayed in the rule editing view has a child element that indicates whether the rule is a regular expression. You can preview the items selected by the rule by right clicking on the node and selecting the preview option from the menu.
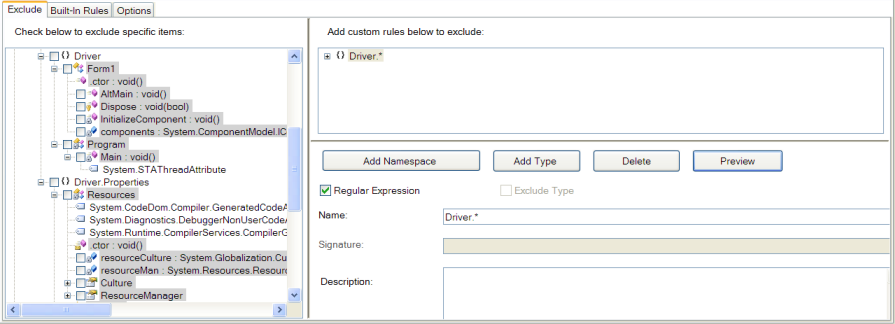
Selecting By Type
A type rule will select differently depending on what type of rule you are creating.
If you are creating a renaming exclusion rule, the rule will select just the type name for exclusion (provided the ExcludeType checkbox is checked), leaving members alone.
If you are specifying any other kind of rule, the rule will select zero or more types and all their members. This reflects the fact that in these cases, selecting a type means that you are in fact selecting all members defined by that type.
Type Name
You create a type rule by clicking the Add Type button, then typing a name in the Name field. The name will be interpreted as a regular expression if the Regular Expression checkbox is checked; otherwise the name will be interpreted literally. The name must be a fully qualified type name that includes the namespace and parent class information if it is a nested type.
Type Attribute Specifier
In addition to type name, you can also select based on type attribute specifiers, using the values provided in the "Spec" list box.
A '-' preceding an attribute specifier negates the attribute (i.e. it selects all types that do not have the specified attribute).
You can select multiple attributes from the list; the criteria implied by multiple selections are logically AND-ed together.
For example, you can select types that are both public and abstract by selecting +public and +abstract from the list.
The attribute specifications are logically AND-ed with the type name, so if you want to select all types with a specific set of attributes, you need to provide a regular expression for the type name that selects all types (i.e. ".*").
Exclude Type Checkbox
The Exclude Type checkbox is only active if you are working with renaming exclusion rules. If checked, the rule will exclude the names of matching types from renaming and allow you to provide additional rules for selecting members of matching types. If left unchecked, the rule will still select matching types for the purposes of applying rules to members of the types, but it will not select the type name. In this manner, you can write renaming exclusion rules that exclude methods and fields, but allow type names to be obfuscated.
Apply to Derived Types Checkbox
The Apply to Derived Types checkbox is only active if you are working with renaming or removal rules. If checked, the rule will additionally exclude the child classes of matching types from renaming or removal. In this manner, you can write renaming exclusion rules that exclude entire inheritance hierarchies.
Type Rule Node
The corresponding node displayed in the rule editing view has a child element that indicates whether the rule is a regular expression and whether the rule has attribute specifiers associated with it. You can preview the types selected by the rule by right clicking on the node and selecting the Preview option from the menu.
In the screen shot, a type rule is defined that selects the names of all concrete (not abstract) types for exclusion from renaming.
Selecting By Method
Method rules are qualified by type rules, so they appear in the rules view as children of type nodes. A method rule will select all methods (in all types matched by the parent type rule) that match your criteria. Supported matching criteria include method name, method attributes, and signature.
Method Name
You create a method rule by right clicking on the parent type rule’s node and selecting Add Method, then typing a name in the Name field. The name will be interpreted as a regular expression if the Regular Expression checkbox is checked; otherwise the name will be interpreted literally.
Method Attribute Specifier
In addition to method name, you can also select based on method attribute specifiers, using the values provided in the Attribute Specifier list box.
A ‘-‘ preceding an attribute specifier negates the attribute (i.e. it selects all methods that do not have the specified attribute).
You can select multiple attributes from the list; the criteria implied by multiple selections are logically AND-ed together (that is, the set of selected methods is the intersection of all methods that match each attribute specifier.).
For example, you can select methods that are both public and virtual by selecting +public and +virtual from the list.
The attribute specifications are logically AND-ed with the method name and signature list, so if you want to select all methods with a specific set of attributes, you need to provide a regular expression for the method name that selects all methods (i.e. ".*").
Method Signature
You can also select methods by signature. A signature specifies both the return type and the parameter types of the method. The method signature reduces the scope of the method rule, so if you want to create a rule that selects methods regardless of signature, you need to provide a regular expression for the signature that selects all signatures (i.e. ".*"). This is the default value.
Method Rule Node
The corresponding method node displayed in the rule editing view has a child element that indicates whether the rule is a regular expression and whether the rule has attribute specifiers, and/or a signature associated with it. You can preview the items selected by the rule by right clicking on the node and selecting the Preview option from the menu.
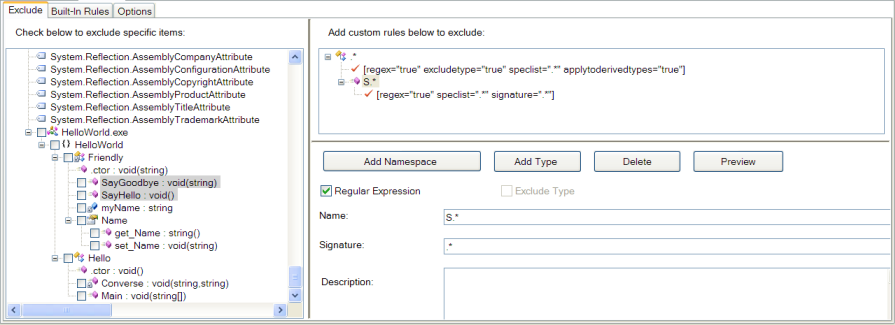
In the screen shot, a method rule is defined that selects the names of all public methods (in all types) whose names start with "S".
Selecting By Field
Field rules are qualified by type rules, so they appear in the rules view as children of type nodes. A field rule will select all fields (in all types matched by the parent type rule) that match your criteria. Supported matching criteria include field name and field attributes.
Field Name
You create a field rule by right clicking on the parent type rule’s node and selecting Add Field, then typing a name in the Name field. The name will be interpreted as a regular expression if the Regular Expression checkbox is checked; otherwise the name will be interpreted literally.
Field Attribute Specifier
In addition to field name, you can also select based on field attribute specifiers, using the values provided in the Attribute Specifier list box.
A ‘-‘ preceding an attribute specifier negates the attribute (i.e. it selects all fields that do not have the specified attribute).
You can select multiple attributes from the list; the criteria implied by multiple selections are logically AND-ed together (that is, the set of selected fields is the intersection of all fields that match each attribute specifier.).
For example, you can select fields that are both public and static by selecting +public and +static from the list.
The attribute specifications are logically AND-ed with the field name, so if you want to select all fields with a specific set of attributes, you need to provide a regular expression for the field name that selects all fields (i.e. ".*").
Field Signature
You can also select fields by signature. A signature specifies the type of the field. The field signature reduces the scope of the field rule, so if you want to create a rule that selects fields regardless of type, you need to provide a regular expression for the signature that selects all signatures (i.e. ".*"). This is the default value.
Field Rule Node
The corresponding field node displayed in the rule editing view has a child element that indicates whether the rule is a regular expression and whether the rule has attribute specifiers, and/or a signature associated with it. You can preview the fields selected by the rule by right clicking on the node and selecting the Preview option from the menu.
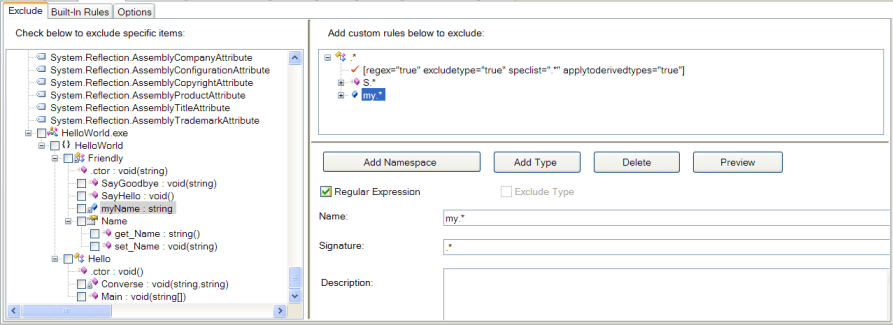
In the screen shot, a field rule is defined that selects the names of all fields (in all types) with names that start with “my”.
Selecting By Property
Property rules are qualified by type rules, so they appear in the rules view as children of type nodes. A property rule will select all properties (in all types matched by the parent type rule) that match your criteria. Supported matching criteria include property name and property attributes.
Property Name
You create a property rule by right clicking on the parent type rule’s node and selecting Add Property, then typing a name in the Name field. The name will be interpreted as a regular expression if the Regular Expression checkbox is checked; otherwise the name will be interpreted literally.
Property Attribute Specifier
In addition to property name, you can also select based on property attribute specifiers, using the values provided in the Attribute Specifier list box.
A ‘-‘ preceding an attribute specifier negates the attribute (i.e. it selects all properties that do not have the specified attribute).
You can select multiple attributes from the list; the criteria implied by multiple selections are logically AND-ed together (that is, the set of selected properties is the intersection of all methods that match each attribute specifier.).
For example, you can select properties that are both public and virtual by selecting +public and +virtual from the list.
The attribute specifications are logically AND-ed with the property’s name and signature list, so if you want to select all properties with a specific set of attributes, you need to provide a regular expression for the property name that selects all properties (i.e. “.*”).
Property Rule Node
The corresponding property node displayed in the rule editing view has a child element that indicates whether the rule is a regular expression and whether the rule has attribute specifiers. You can preview the items selected by the rule by right clicking on the node and selecting the Preview option from the menu.
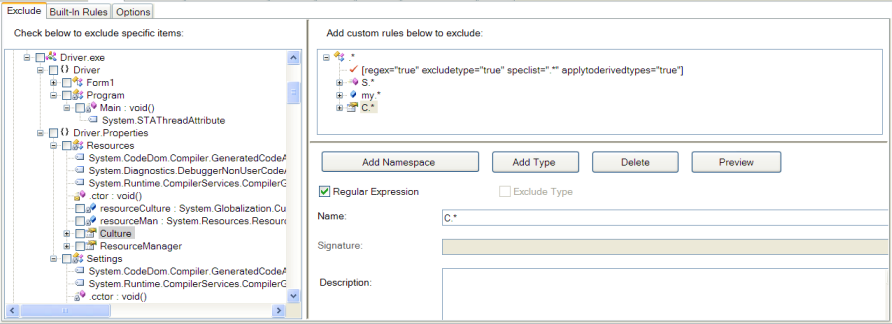
In the screen shot, a property rule is defined that selects the names of all public properties (in all types) whose names start with "C".
Selecting By Event
Event rules are qualified by type rules, so they appear in the rules view as children of type nodes. An event rule will select all events (in all types matched by the parent type rule) that match your criteria. Supported matching criteria include event name and event attributes.
Event Name
You create a event rule by right clicking on the parent type rule’s node and selecting Add Event, then typing a name in the Name field. The name will be interpreted as a regular expression if the Regular Expression checkbox is checked; otherwise the name will be interpreted literally.
Event Attribute Specifier
In addition to event name, you can also select based on event attribute specifiers, using the values provided in the Attribute Specifier list box.
A ‘-‘ preceding an attribute specifier negates the attribute (i.e. it selects all events that do not have the specified attribute).
You can select multiple attributes from the list; the criteria implied by multiple selections are logically AND-ed together (that is, the set of selected events is the intersection of all events that match each attribute specifier.).
For example, you can select events that are both public and static by selecting +public and +static from the list.
The attribute specifications are logically AND-ed with the event name, so if you want to select all events with a specific set of attributes, you need to provide a regular expression for the event name that selects all events (i.e. ".*").
Event Rule Node
The corresponding event node displayed in the rule editing view has a child element that indicates whether the rule is a regular expression and whether the rule has attribute specifiers. You can preview the events selected by the rule by right clicking on the node and selecting the Preview option from the menu.
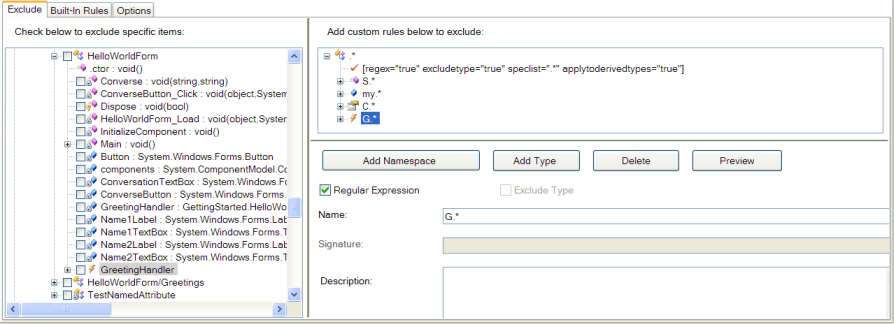
In the screen shot, an event rule is defined that selects the names of all events (in all types) with names that start with "G".
Selecting By Custom Attribute
Custom attribute rules are qualified by type, method, field, property, or event rules, so they appear in the rules view as children of type, method, field, property, or event nodes. A custom attribute rule will select all items selected by the parent node that are also annotated with a matching custom attribute.
Custom Attribute Name
You create a custom attribute rule by right clicking on the parent type, method, field, property, or event rule’s node and selecting Add Custom Attribute, then typing a name in the Name field. The name will be interpreted as a regular expression if the Regular Expression checkbox is checked; otherwise the name will be interpreted literally.
Allow Inheritance Checkbox
The Allow Inheritance checkbox controls how the custom attribute rule is applied to inheritance hierarchies. If checked, the rule will additionally exclude overriding methods, properties, events, and sub types.
Custom Attribute Rule Node
The corresponding custom attribute node displayed in the rule editing view has a child element that indicates whether the rule is a regular expression. You can preview the types, methods, fields, properties, or events selected by the rule by right clicking on the node and selecting the Preview option from the menu.
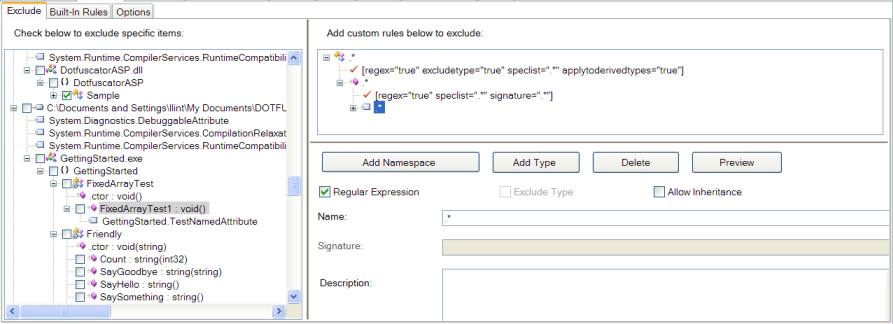
In the screen shot, a custom attribute rule is defined that selects all methods that are annotated with a custom attribute named GettingStarted.TestNamedAttribute.
Selecting By Supertype
Supertype rules are qualified by type rules, so they appear in the rules view as children of type nodes. A supertype rule will narrow the scope of a type rule so that only types matched by the parent type rule that also derive from the specified supertype are selected.
Supertype Name
You create a supertype rule by right clicking on the parent type rule’s node and selecting Add Supertype, then typing a name in the Name field. The name will be interpreted as a regular expression if the Regular Expression checkbox is checked; otherwise the name will be interpreted literally.
Supertype Rule Node
The corresponding supertype node displayed in the rule editing view has a child element that indicates whether the rule is a regular expression. You can preview the types selected by the rule by right clicking on the node and selecting the Preview option from the menu.
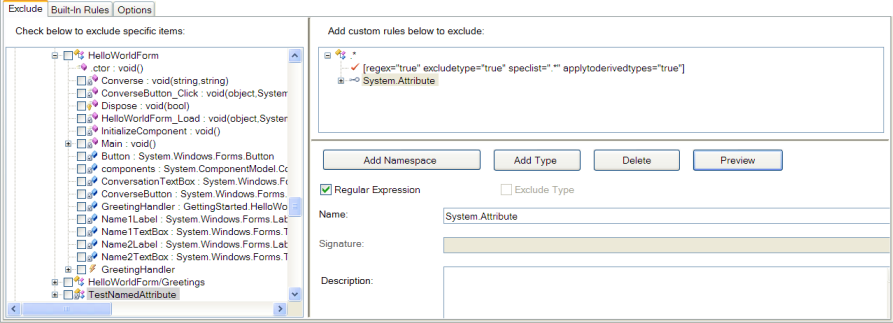
In the screen shot, a supertype rule is defined that selects all types that are supertypes of System.Attribute.
Editing and Deleting Rules
To edit an existing rule, simply click on the rule in the rule editing view. You can then use controls below the view to edit the values associated with the node (e.g. name, attribute specifier list, etc.).
To delete a rule, click on the rule in the rule editing view, and press the Delete button.
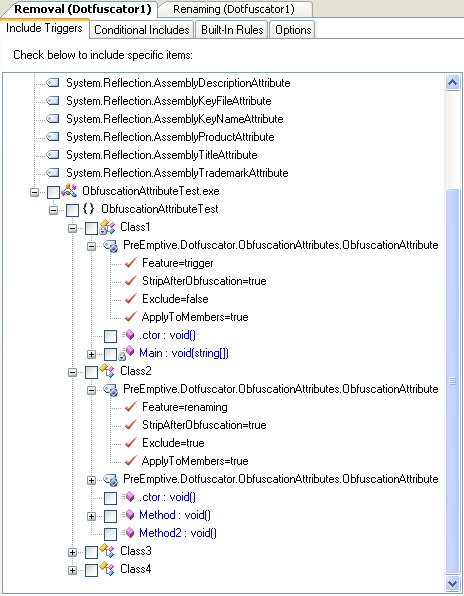
Using Declarative Obfuscation with Rules
The rules editor provides support for Declarative Obfuscation by displaying the arguments of all obfuscation attributes (i.e. System.Reflection.ObfuscateAssemblyAttribute and System.Reflection.ObfuscationAttribute) in the application tree view.
Items in the application tree view (types, methods, fields) that are selected by an obfuscation attribute appear in blue.
In the screenshot below, the methods of Class1 and Class2 are marked as removal triggers using ObfuscationAttributes.
Each attribute's properties and values are expanded in the view.
Previewing Rules
To preview the effects of a single rule in the rule editing view, right click on the rule’s node and select Preview from the menu. Items selected by the rule will appear shaded in the application tree view.
To preview the combined effects of all the rules defined in the rule editing view, click on the Preview button. All items selected by applying all the rules will appear shaded in the application tree view.
Dotfuscator Version 4.33.0.6680. Copyright © 2017 PreEmptive Solutions, LLC