The Visual Studio Integration
In this section, we describe how to use Dotfuscator when integrated with Visual Studio. Inside Visual Studio, you can create and edit Dotfuscator projects and add them to your existing solutions. During a build, a Dotfuscator project can consume binary outputs (i.e. your compiled .NET assemblies) from the development projects in your solution, and in turn, expose the obfuscated outputs to deployment projects.
Creating a Dotfuscator Project
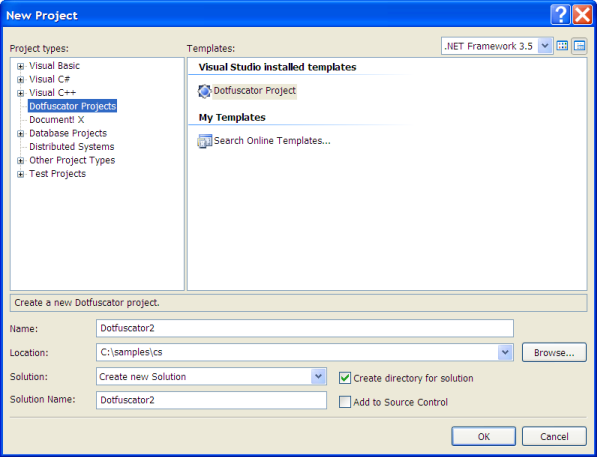
To create a Dotfuscator project and add it to an existing or new solution, perform the same steps that you would for other Visual Studio project types:
- From the New Project dialog, open the Dotfuscator Projects folder in the list of Project Types.
- Select the Dotfuscator Project from the template list.
- Provide a name and location for your project or accept the defaults.
- In the Solution: field, you can choose to create a new solution or add to an existing solution.
- Provide a name for your Solution.
- You can select if you want to Create Directory for solution and if you want to Add solution to Source Control by checking the appropriate box(es).
- Click OK.
Solution Explorer and the Dotfuscator Project Tree
When working with Dotfuscator Projects in Visual Studio, Solution Explorer is the starting point. Like many other project types, Dotfuscator projects appear as trees in Solution Explorer.
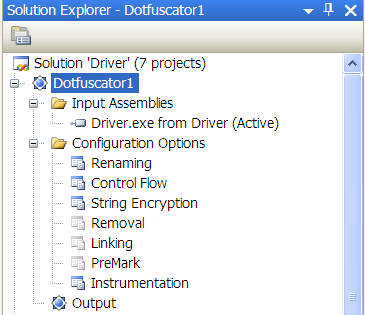
The top level project item in the Dotfuscator project tree always has the name that you have given to your Dotfuscator project. You can access the project's property pages from this item through its context menu. See Project Properties for a description of the property pages that a Dotfuscator project provides.
There are always three items immediately under the top level Dotfuscator Project item:
Input Assemblies Folder
This is where you manage the inputs that are to be obfuscated. Right clicking on this item gives you a context menu that may be used to add Inputs. Once added, each package and assembly appears as an item in the folder. An input may be removed from the project by selecting the item and pressing the Delete key. See Working with Inputs for more information about the different kinds of inputs.
Configuration Options Folder
This folder contains an item for each available configuration editor. You can display the editor by double clicking the appropriate item.
Output Browser Item
After you build your Dotfuscator project, you can browse the output assemblies by double clicking this item. The output browser provides a view of your assemblies similar to that provided by class browser. It shows original and obfuscated symbol names, as well as indicating which symbols were removed from the input assemblies.
Project Configurations
With the exception of inputs and their properties, Visual Studio Dotfuscator Project settings are configuration dependent. In other words, you can have different obfuscation settings based on the current active configuration. For example, in a debug build you may want to emit the debugging symbol file, while for a release build you might not.
Dotfuscator project configurations are managed with Visual Studio's Configuration Manager in the same way as other Visual Studio project types. Through the Configuration Manager, you can edit, create, and remove Dotfuscator project configurations. You can also associate them with your solution configurations.
By default, when you create a Dotfuscator project, two project configurations are created for you and associated with the corresponding solution configuration: Debug and Release. These two configurations are identical at project creation time, except the debug configuration has a project property set to Emit Debugging Symbols.
Deploying a Dotfuscator Project
Within Visual Studio, a Dotfuscator project exposes its outputs, just like other familiar Visual Studio project types, such as C# or VB.NET. As a result, you can use a Dotfuscator project as a source for any deployment or setup project that knows how to consume Visual Studio projects. This section assumes you are familiar with setup and deployment projects.
Dotfuscator exposes several output groups, summarized below:
| Output Group | Description |
|---|---|
| Primary Output | Contains the output assemblies and any package artifacts |
| Localized Resource DLLs | Contains satellite DLLs |
| Reports | Contains removal report and HTML report files |
| Map Files | Contains XML renaming map file |
| Debug Symbols | Contains PDB files for output assemblies, if any. |
To tell a setup project to package all your obfuscated assemblies, simply point the setup project to the Dotfuscator project’s Primary Output group.
For assemblies that are sourced from other Visual Studio Projects, Dotfuscator also exposes the source project’s dependencies to the deployment project.
Working with Inputs
Input packages and assemblies are displayed in the Dotfuscator project tree in Solution Explorer in the Input Assemblies folder. You can add inputs by using the context menus associated with the top level project item, the Input Assemblies folder item, or from Visual Studio's Project menu.
There are two ways to add input assemblies, depending on whether you want to obfuscate an output from another Visual Studio project in your solution, or simply obfuscate a package or assembly on your file system.
Input Assemblies from other Projects
To have Dotfuscator use another project's output, you add the input assembly via the Add Project Output item that is on the Dotfuscator project's context menu or on Visual Studio's project menu. Selecting this item shows Dotfuscator's Add Project Output dialog. From this dialog you can browse the other projects in your solution.
Each Visual Studio project type defines a set of output groups that other projects may access.
Output groups contain files that are created by the source project.
For example, in the screen shot below, the GettingStarted C# project defines an output group called Primary output and places the output binary in it (GettingStarted.exe).
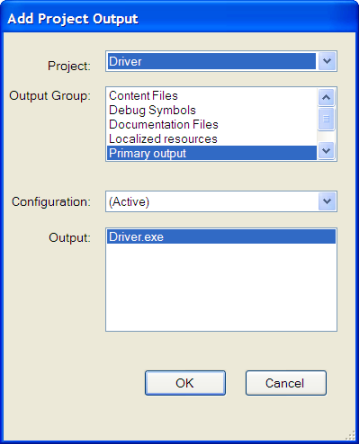
The contents of an output group can vary by project configuration.
For example, the GettingStarted project creates a GettingStarted.exe for both the Debug and Release configurations, but these are written to different directories when a build is performed.
You can tell Dotfuscator to always use a particular output group based on configuration, or you can tell Dotfuscator to always use the output group from whichever project configuration is currently active.
When you select the active configuration, Dotfuscator will automatically update its inputs whenever the source project's configuration changes.
Inputs from the File System
To tell Dotfuscator about a package or input assembly on your file system, you add the input via the Add Input item that is on the Dotfuscator project's context menu or on Visual Studio's project menu. Selecting this item brings up a file browse dialog that will allow you to choose one or more inputs.
Project Properties
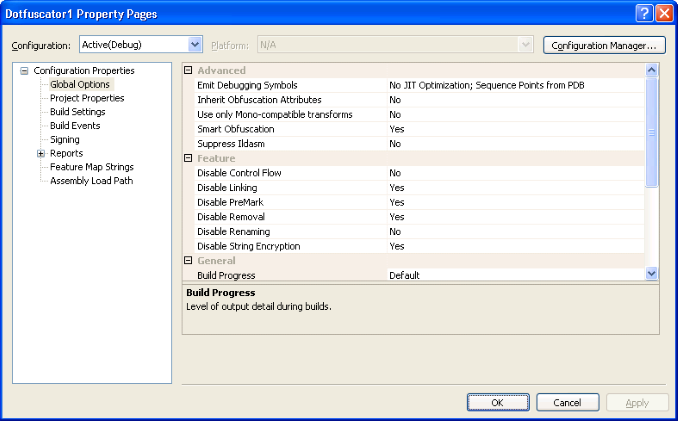
In Visual Studio, you can access a Dotfuscator project's property pages from the top level item for the project in Solution Explorer:
Configuration Properties > Options
The Options property page allows you to set the options for the Project. These are explained in detail in the Global Options Section. You can also selectively enable Dotfuscator’s features. Here is a summary of the properties you can set:
- Disable [feature]: Dotfuscator allows you to enable or disable each of its transforms. When a transform is disabled, its Configuration Option node appears “grayed out” in solution explorer. You can enable or disable a transform using this property sheet or by right clicking on the appropriate node and checking or un-checking the Disabled menu item. The transforms that are Disabled by default in new projects include: Linking, Watermarking, Removal, and String Encryption; Transforms that are Enabled by default in new projects include Renaming, Control Flow and Injection.
- Build Progress: This controls the verbosity of Dotfuscator's output during a build.
- Error: This setting is for diagnostic purposes. Turning this on will prevent Dotfuscator from deleting the generated IL that is written to the temp directory during a build.
- Smart Obfuscation: This allows you to enable or disable automated renaming and removal exclusions for selected application types. See Smart Obfuscation for more details. By default, it is enabled.
- Investigate Only: This tells Dotfuscator to generate reports but no output assemblies.
- Use only Mono-compatible transforms: This setting disables transforms that have previously been found to cause runtime errors under the Mono runtime. Turning this option on may reduce your protection from decompilers, but helps ensure your app runs under platforms other than Microsoft's .NET. By default, it is disabled.
- Emit Debugging Symbols: Emit debugging symbols for obfuscated assemblies and control JIT behavior. See Debug Option.
- Suppress Ildasm: This tells Dotfuscator to add the
SuppressIldasmAttributeto all output assemblies which will prevent Microsoft's Ildasm utility from displaying the assembly's IL. See Suppress Ildasm for more information. This is only valid for assemblies targeting .NET 2.0 and above. - The Injection subsection's options are described here.
Configuration Properties > Project Properties
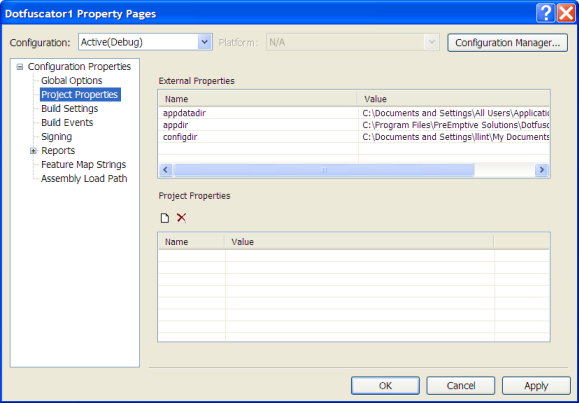
The Project Properties page contains a facility to view and add user-defined name-value pairs as Project Properties and to view External Properties that have been defined by Dotfuscator itself.
Project Properties can be thought of as simple string substitution macros that may be used wherever a filename or path is required. See Property List and Properties for a full explanation.
To add a Project Property, click the New button, then edit the property name and value in the Project Properties grid. To delete one or more Project Properties, select the row or rows in the Project Properties grid that you wish to delete, then click the Delete button.
Configuration Properties > Build Settings
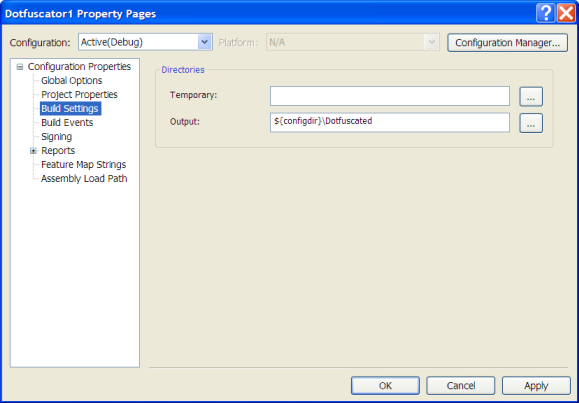
The Build property page allows you to specify the output directory and an optional temporary directory.
Build Directories
When you create a new project, the output directory is set by default to ${configdir}\Dotfuscated.
The ${configdir} is a built in property that is expanded to the folder that your project config file is saved to.
If you want to choose a different output directory, you can browse for it or type it into the Output Directory text box.
You can also optionally specify a temporary directory for Dotfuscator to use for scratch files during processing. If not specified, the temp directory specified by the Windows environment is used.
Configuration Properties > Build Events
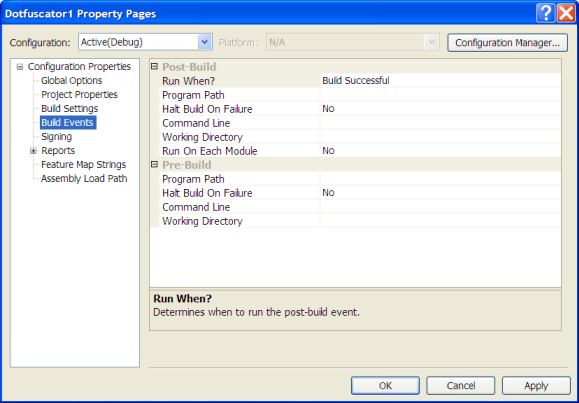
The Build Events property page is where you specify Build Events for your Dotfuscator project. For each event, specify an external program (Program Path) that runs when the event occurs. You can specify a working directory and command line options for the program and you can specify if the Dotfuscator build should halt (fail) if the specified program fails.
For the post build event, specify under what conditions it will run (e.g. all the time, only if the build succeeds, or only if the build fails).
You can also specify whether you want the post build event to run only once for the project, or run once for each output module.
Configuration Properties > Signing
Strong Naming
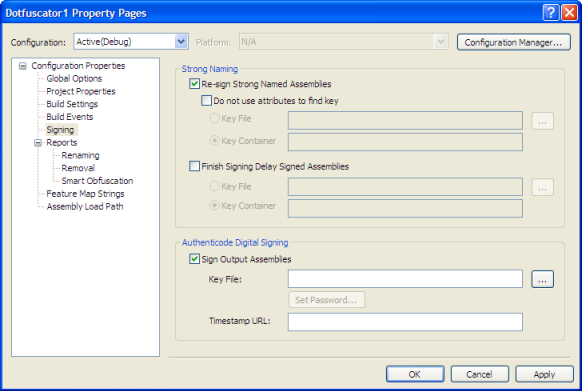
The Signing property page allows you to configure Dotfuscator to automatically sign or resign strongly named assemblies. See Obfuscating Strong Named Assemblies for more information.
Authenticode Digital Signing
The Authenticode Digital Signing option allows you to attach an Authenticode digital signature to your application. Similar to a security certificate, this signature certifies that the application you are obfuscating and instrumenting is your intellectual property, and allows users to ensure that the resulting binaries were provided by you alone and have not been modified. This feature adds another level of security to safeguard your application. To attach an Authenticode signature to your output assemblies, check the Sign Output Assemblies checkbox and then click the "…" (ellipsis) to locate your Key File, or enter its path in the text box. Once the Key File field is properly populated, click the Set Password... button to set the password for your Key File.
The Timestamp URL field provides the ability for you to specify the URL of an Authenticode timestamp service. This URL will be accessed during Dotfuscator's signing process, and will provide additional data which will allow your assemblies' Authenticode signatures to remain valid after your code-signing certificate has expired. This element is optional. If omitted, this additional data will not be included, and your assemblies' Authenticode signatures will become invalid once your code-signing certificate expires.
Configuration Properties > Reports > Renaming
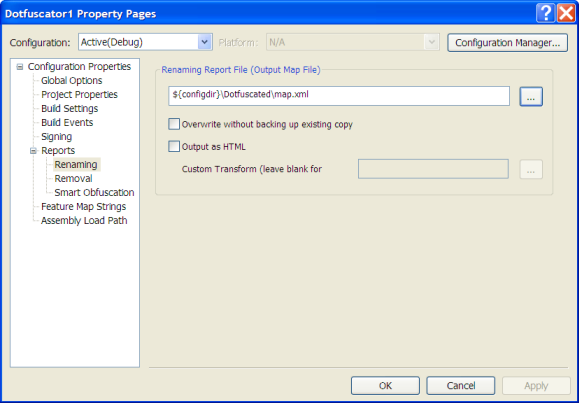
The renaming report provides a summary of all the elements renamed by Dotfuscator during a specific run, including a statistics section. The Renaming Report File (Output Map File) section allows you to specify the location to save a renaming map file. You may leave the default value, or enter your preferred path. If you know the name and path of the mapping file you want to use, you can type it directly into the text box. Alternatively, you can browse your file system for the intended file location. The Browse button on the right of the text box brings up the Select Map Output File window that provides a familiar navigational dialog.
You also have the option of overwriting the output file each time you build the application without generating a backup of the existing copy of the output. Dotfuscator has a default transform that can generate a readable HTML formatted version of the report in addition to the default .XML format. If you do check the Output As HTML box, the Custom Transform (Leave blank for default) field is activated. As the field name states, leave this blank for the default custom transform or click "…" (ellipsis) to select the location of your choice.
Configuration Properties > Reports > Removal
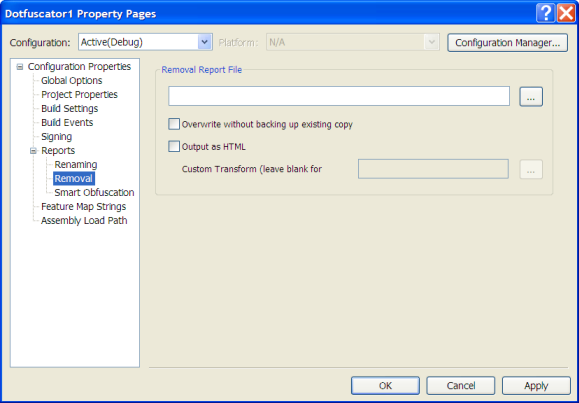
The removal report provides a summary of all the elements removed by Dotfuscator during a specific run, including a statistics section. The Removal Report File section allows you to specify the location to save the report. Two approaches are available. If you know the name and path of the file you want to use, you can type it directly into the text box. Alternatively, you can browse your file system for the intended file location. The "…" (ellipsis) button on the right of the text box brings up the Select Removal Report File window that provides a familiar navigational dialog.
You also have the option of overwriting the output file each time you build the application without generating a backup of the existing copy of the output. The removal report can also be written out as a readable, HTML formatted document, in addition to the XML formatted version. This report provides a quick cross reference that allows you to quickly navigate through all types, fields, and methods to see at a glance which were removed. Checking the Output as HTML checkbox tells Dotfuscator to write this report using the same name and path information as the XML version. If the default HTML report doesn't meet your reporting requirements, you can provide your own XSL document that Dotfuscator uses to transform the XML version. If you do check the Output As HTML box, the Custom Transform (Leave blank for default) field is activated. As the field name states, leave this blank for the default custom transform or click "…" (ellipsis) to select the location of your choice.
Configuration Properties > Reports > Smart Obfuscation
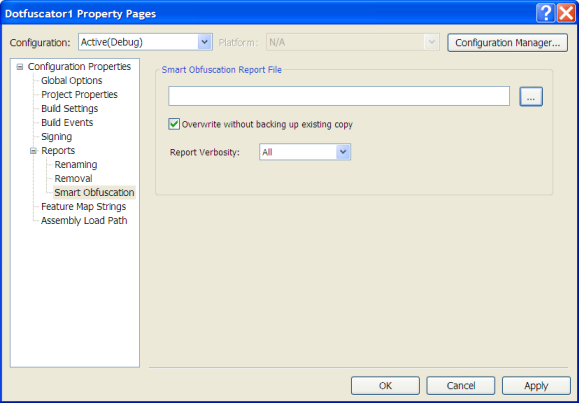
The smart obfuscation report provides a summary of all the elements that could not be renamed or removed based on rules provided by the smart obfuscation feature. If items are excluded by smart obfuscation but no destination for the report is specified, the report will appear in the Smart Obfuscation Report view of the Output tab at the bottom of Visual Studio's window. The Smart Obfuscation Report File field allows you to specify the location to save the report. Two approaches are available. If you know the name and path of the mapping file you want to use, you can type it directly into the text box. Alternatively, you can browse your file system for the intended file location. The "…" (ellipsis) button on the right of the text box brings up the Select Smart Obfuscation Report File window that provides a familiar navigational dialog.
You have the option of overwriting the output file each time you build the application without generating a backup of the existing copy of the output. You may also optionally configure the verbosity of the report. Allowed values for the verbosity attribute are All, Warnings Only, and None. The default value is All.
Configuration Properties > Setup > Feature Map Strings
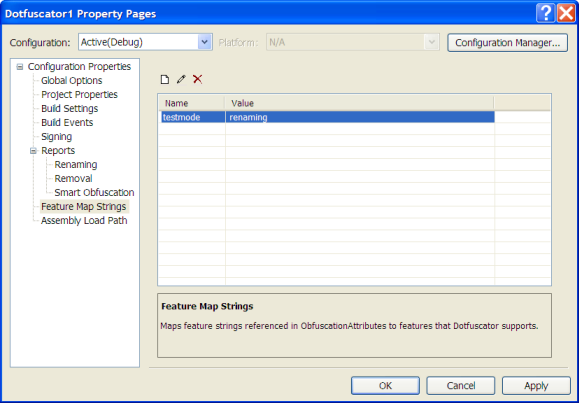
The feature map strings property page is for Declarative Obfuscation. For a complete description of Dotfuscator’s support for Declarative Obfuscation, see Declarative Obfuscation via Custom Attributes. That section describes the Feature Map and lists the native feature strings that Dotfuscator understands.
From the toolbar, you can add, edit, and remove feature map strings. The Add and Edit buttons bring up a dialog that allows you to map feature strings to supported Dotfuscator features.
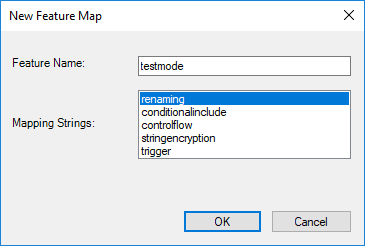
When you click the Add icon, the New Feature Map dialog box displays. Enter the Feature Name and select the appropriate Mapping String for that feature. To select more than one mapping string, press and hold the Control key and click on the appropriate Mapping String. Click OK when you are done.
The new feature and its strings display in the Feature Map Strings Property page:
Configuration Properties > Setup > Assembly Load Path
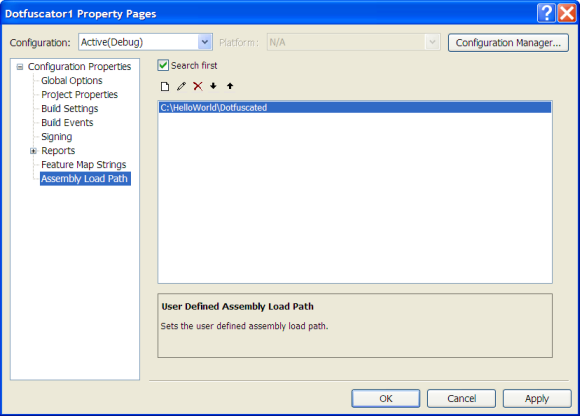
Using this property page, you can edit your project’s user defined assembly load path. From the toolbar, you can add or remove directories, edit existing directories, or change the order in which they are searched. Check the Search First checkbox to have Dotfuscator search the load path before applying its standard search. When unchecked, Dotfuscator will search the loadpath only after applying its standard search.
Input Assembly Properties
In Visual Studio, every input assembly exposes properties to the properties window. To bring up the properties window for an input assembly, select the input assembly node under your Dotfuscator project in Solution Explorer, then launch Visual Studio’s properties window (from the View menu or using F4). You can manage properties for multiple input assemblies by selecting multiple input assemblies; the properties exposed in the properties window apply to the group of selected assemblies.
From here, for each assembly you can set library mode, set the Transform XAML mode, mark if it should be obfuscated or left as a package artifact, and configure the processing of the attributes used in Declarative Obfuscation.
You can also set injection options for selected assemblies here.
In addition, there are read-only properties that display information about the input assembly’s file.
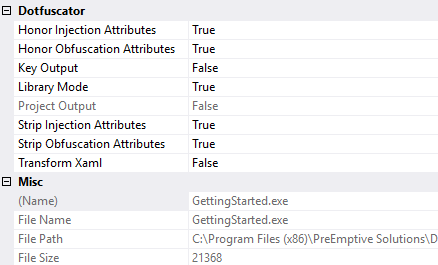
In the Dotfuscator section of the Properties panel, you may set the following to True or False:
Artifact: Setting the Artifact to True tells Dotfuscator to not process the specified assembly as an input. It will not be obfuscated or instrumented and all existing signatures will be preserved. Setting the Artifact to False will cause Dotfuscator to process the assembly as an input for obfuscation and instrumentation.
Honor Injection Attributes: an assembly-level injection property which may be set to True or False here.
Strip Injection Attributes: an assembly-level injection property which may be set to True or False here.
Honor Obfuscation Attributes: a Declarative Obfuscation property which may be set to True or False here.
Strip Obfuscation Attributes: a Declarative Obfuscation property which may be set to True or False here.
Key Output: This setting allows you to explicitly set one of the Dotfuscator project’s input assemblies to be the key output assembly. The key output is consumed by deployment projects. If assembly linking is enabled, a linked output assembly will be the key output if one of its source assemblies was marked as the key output. If no input assembly is marked as the key output, Dotfuscator will choose one.
Transform XAML: Dotfuscator can rename items in XAML resources as used in Silverlight applications as well as the compiled XAML resources (BAML) of Windows Presentation Foundation applications. The default value is True, which tells Dotfuscator to attempt to rename items in the markup resources and match the renaming to the items references in the code-behind. Leaving this option enabled significantly strengthens the obfuscation of Windows Presentation Foundation and Silverlight applications as well as decreasing the number of items that must be manually excluded from renaming.
Input Package Properties
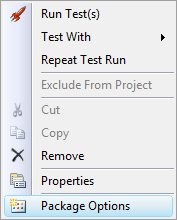
In Visual Studio, some package inputs expose properties to the properties window. To bring up the properties window for an input assembly, select the package node under your Dotfuscator project in Solution Explorer, then right click and select the Package Options menu item to launch the package specific properties window.
Configuring
Within a Visual Studio Dotfuscator project, you configure settings independently for each feature. Each feature has an editor that may be launched by double clicking on the appropriate item in your Dotfuscator project tree opened in Solution Explorer. Each editor is described in the following topics:
- Renaming Editor
- Control Flow Editor
- String Encryption Editor
- Removal Editor
- Linking Editor
- PreMark Editor
- Injection Editor
Building the Project
A Visual Studio Dotfuscator project, like other Visual Studio project types, can be built at the project level and, by default, will be built when its containing solution is built. If you do not want your Dotfuscator project to be built for a particular solution configuration, you can turn off build using Visual Studio's Configuration Manager.
When a Dotfuscator project builds, it applies the settings for its active configuration to the inputs. The output packages and assemblies are then written to the directory specified on the project's Build property page.
During the build, Dotfuscator's output is written to Visual Studio's output window, and any build errors are added to the task list.
After a successful build, the output browser is updated. You can activate the output browser by double clicking the Output Browser item for your Dotfuscator project in the Solution Explorer. The output browser provides a view of your output assemblies similar to that provided by the class browser. It shows original and obfuscated symbol names, as well as indicating which symbols were removed from the input assemblies.
If you chose to generate HTML reports for renaming or removal, these too are available for viewing after a build.
The View Menu
The Visual Studio Integrated version of Dotfuscator adds a Dotfuscator cascading menu to Visual Studio's View menu. Depending on what you are doing, you will see up to four items on this menu: Two items for viewing reports generated by a successful build, one item for launching the stack trace decoding tool, and one item to generate new shelf life tokens.
Viewing HTML Reports
HTML renaming and removal reports can be viewed in Visual Studio. If the HTML report files exist and your Dotfuscator project is the active project in Solution Explorer, then two menu items (one for each report) are enabled on the View > Dotfuscator menu. Clicking on one will bring up the appropriate report in your default browser.
See The Rename Options Tab for setting up HTML Reports for renaming, and The Removal Options Tab for removal.
Stack Trace Decoding Tool
In Visual Studio, Dotfuscator's Stack Trace Decoding Tool is implemented as a Visual Studio tool window. You can activate it by clicking View > Dotfuscator > Decode Obfuscated Stack Trace from the menubar. For details on how to use the tool, see Decoding Obfuscated Stack Traces.
Shelf Life Token Generator
In Visual Studio, Dotfuscator's Shelf Life Token generator is implemented as a Visual Studio tool window. You can activate it by clicking View > Dotfuscator > Generate Shelf Life Token from the menubar. For details on how to use the tool, see Generate Shelf Life Token.
The Help Menu
The Visual Studio Integrated version of Dotfuscator adds a Dotfuscator cascading menu to Visual Studio's Help menu. The menu contains the following items:
- Register Product: This item is only enabled if your copy has not yet been activated. When selected, it invokes Dotfuscator's activation dialog. See the Activation section for more information.
- What's New: When selected, this launches a browser that takes you to Dotfuscator's home page.
- Customer Feedback Options: This item allows you to configure your participation in PreEmptive Solutions’ anonymous Customer Feedback Program, which helps improve the Dotfuscator family of software products and services.
- Check For Updates Now: When selected, Dotfuscator immediately checks the web for updates.
- About Dotfuscator: When selected, this brings up Dotfuscator's About box which displays user and version information.
Set User Preferences
In Visual Studio, Dotfuscator's User Preferences are available by clicking Tools > Options > Dotfuscator menu.
In the News and Updates section of this dialog box, users may opt to allow Dotfuscator to periodically check for updates.
In the Network section of this dialog, the configuration settings of a proxy server for network access may be entered. Proxy information is not required if you do not have a proxy server or if those settings are controlled via system proxy.
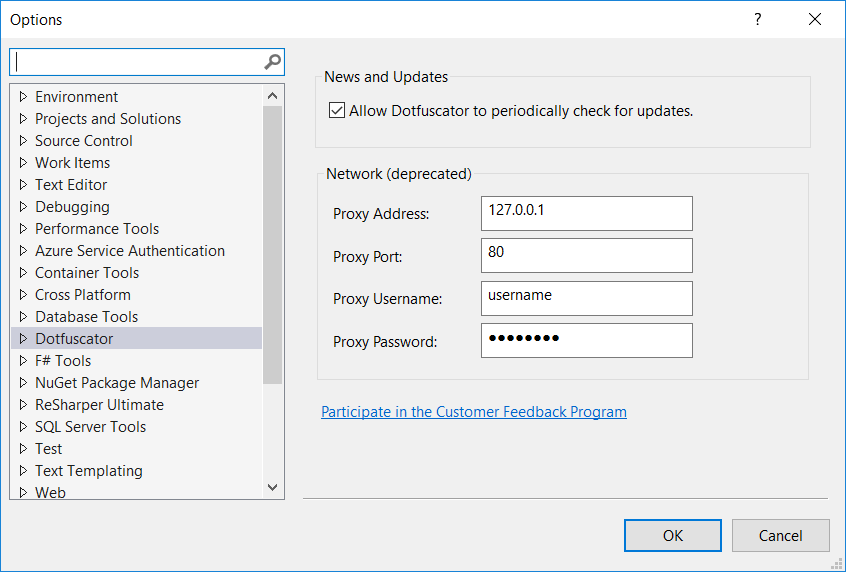
The User Preferences Option window has a link to launch the Customer Feedback Program dialog. The text in the link shows your current opt-in/opt-out status.