NOTE: These instructions are deprecated; There are new instructions for Dotfuscator Community and for Dotfuscator Professional v4.37 and above.
As of its 4.20 release, Dotfuscator Professional supports protecting Universal Windows Platform (UWP) applications.
There are two recommended ways to incorporate Dotfuscator into your UWP application build process: (1) integrate Dotfuscator into the MSBuild pipeline or (2) use Dotfuscator directly on your appx packages. These methods differ in their ease-of-use and in the level of protection they provide.
Note There is an issue with Method 1 when working with solutions that include a library project. We recommend using Method 2 for all projects. Please contact support if you have issues or questions.
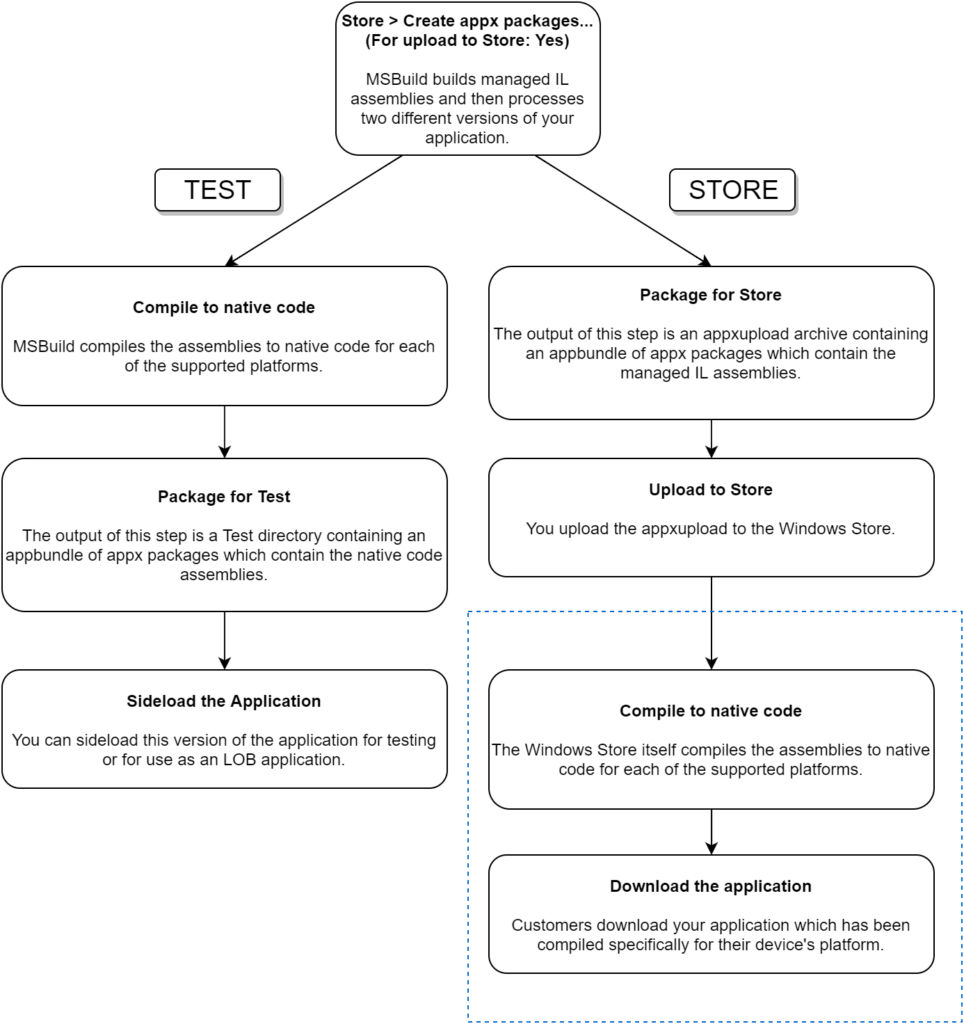
In order to assess which approach is right for you, we need to think about the build process for UWP applications. The following diagram illustrates the process of generating artifacts when choosing Store > Create App Packages… in Visual Studio.
All of the diagrams and instructions in this article assume that the following are true:
When building a UWP application to deploy to the Windows Store in this manner, two application builds are performed.
The first is the Store Build. The assemblies are compiled to IL, packaged in appx files, and archived together in an appbundle. The appbundle, along with other ancillary files, is packaged in an appxupload archive. This archive file is what you upload to the Windows Store. After upload, the Windows Store itself compiles the assemblies to native code suitable for the relevant target platforms.
The second is the Test Build. The assemblies are compiled to IL and then to native code with the .NET Native compiler. They are packaged in appx files and archived together in an appbundle. The appbundle along with other ancillary files are put into a directory whose name will be something like MyApplication_1.3.2.0_Test. Inside of this directory will be a powershell script that will help you sideload the native-code application. Because these assemblies are compiled to native code, testing this application will be most like testing what your customers will obtain from the Windows Store.


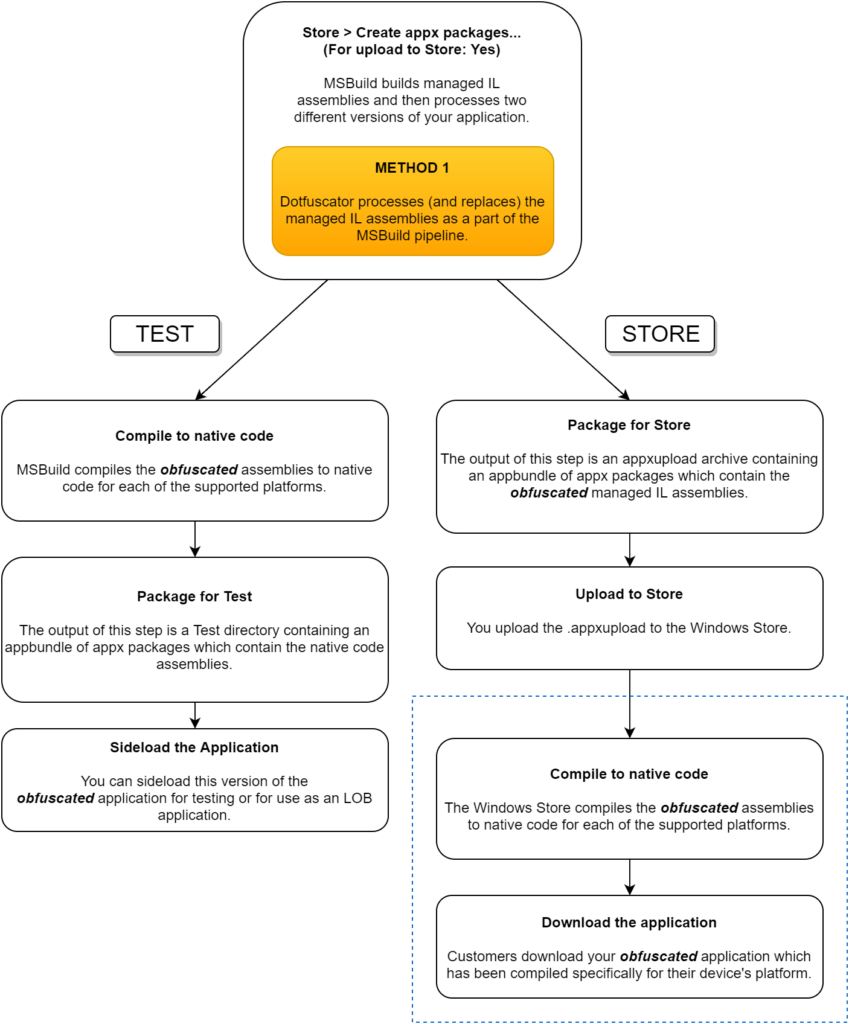
We recommend integrating Dotfuscator into the MSBuild pipeline, because it is the easiest to setup and the easiest to use. It further allows you to easily test natively-compiled obfuscated code, just like your users will get from the store.
However, this approach currently offers somewhat less protection than running Dotfuscator directly on the appx packages post-build. In particular, the XAML (BAML) resources will not be processed for renaming. The next version of Dotfuscator will address this issue so that you will not have to turn off XAML transformation on your input assemblies when using the convenient MSBuild integration. At that time, this approach will be the clear choice over using Dotfuscator manually on the appx packages. UPDATE Version 4.21 of Dotfuscator supports XAML resources as part of the MSBuild pipeline, this is the preferred method going forward.
Find detailed instructions for integrating Dotfuscator into the MSBuild pipeline below.
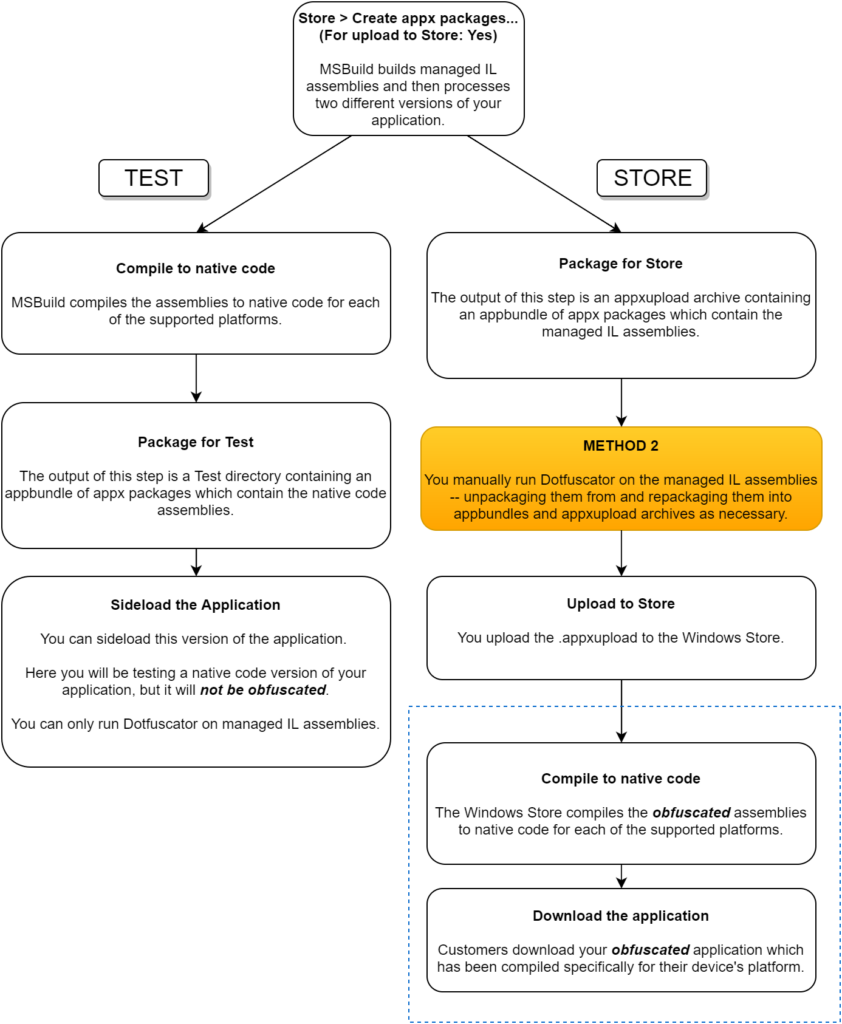
This method is most often used in organizations where one team is responsible for developing the application while another team is responsible for adding protection to the application after it has already been built but before it has been deployed to the Windows Store or distributed internally as an LOB application. In other words, you don’t need to have access to the source code or build environment in order to protect your UWP application with Dotfuscator.

Notice that the Test Build will not be obfuscated, because Dotfuscator cannot process native code assemblies.
Find detailed instructions for using Dotfuscator directly on the appx packages below.
When incorporating your UWP application into the MSBuild process, you should turn off Renaming and Removal until you have verified that Dotfuscator is, in fact, executing in the build process and that the resulting application is working correctly. Once you’ve verified this, you can turn Renaming and Removal back on and configure any exclusions that may be necessary.
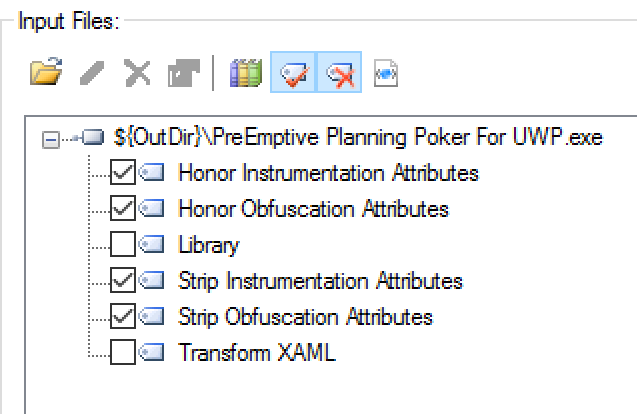
Until there is a Dotfuscator release that processes your XAML (BAML) resources during the MSBuild process, you should uncheck Transform XAML on your UWP assemblies. This can be done on the Input tab of the stand-alone Dotfuscator UI:

In each of your UWP csproj files, add a UsingTask reference to the Dotfuscator task:
<UsingTask TaskName="PreEmptive.Tasks.Dotfuscate" AssemblyFile="$(MSBuildExtensionsPath)PreEmptiveDotfuscator4PreEmptive.Dotfuscator.Tasks.dll" />
Note that we referenced version 4 of the
PreEmptive.Dotfuscator.Tasks.dll. Make sure that you are using the most up-to-date version of Dotfuscator you have (in case you have side-by-side installations of Dotfuscator).
Next, in these same csproj files, configure this Dotfuscator task to be executed during the AfterGenerateAppxManifest build target:
  <Target Name="AfterGenerateAppxManifest">
    <PropertyGroup>
      <DotfuscatorProperties>
        <OutDir>$(OutDir)</OutDir>
        <OutputPath>$(OutputPath)</OutputPath>
      </DotfuscatorProperties>
    </PropertyGroup>
    <Dotfuscate ConfigPath="Dotfuscator.xml" Properties="$(DotfuscatorProperties)" />
  </Target>
The AfterGenerateAppxManifest target will run before any native code compilation and before the packaging step in the Visual Studio deployment.
Notice that we are passing in the OutDir and OutPath properties from the build process to the Dotfuscator process. We can then specify paths in the Dotfuscator project to allow us to configure the project using the stand-alone Dotfuscator UI, while having the build process handle where they actually are at build time.
UPDATE As of Dotfuscator 4.21, you will want to include the $(OutDir) directory as the input. Dotfuscator will recognize the directory as an exploded Appx package, allowing it to properly update markup files.
In order for the UWP-specific build process to find the obfuscated assemblies, they have to be copied back into the original assembly locations after obfuscation. The easiest way to accomplish this is to configure a post-build event in the Dotfuscator project to do this copying for you:

UPDATE As of Dotfuscator 4.21, you will want to include the $(OutDir) directory as the input. Dotfuscator will recognize the directory as an exploded Appx package, allowing it to properly update markup files.
/c xcopy /e /y "${configdir}Dotfuscated" "${OutDir}"Once these steps are complete, you should be able to see Dotfuscator build output during your builds in Visual Studio or when running MSBuild from the command line.
Set MSBuild project build output verbosity to at least Normal in order to see Dotfuscator-related output. (The following image is from using Detailed verbosity.) In Visual Studio 2015, you can set this verbosity level under Tools > Options > Projects and Solution ‒ Build and Run.

You can now judiciously turn on Removal and Renaming. Minimally, exclusions will be required for classes and methods referenced in XAML and in the appxmanifest.
For simplicity, these instructions assume that the person building the application is the same as who is processing the application with Dotfuscator. If these people or teams are different, it’s only a matter of creating agreement on how the application will be built in order for it to be processed by Dotfuscator.
When you choose Store > Create App Packages… in Visual Studio, you will be asked Do you want to build packages to upload to the Windows Store?. The following instructions assume that you have answered Yes. This will cause the build process to generate both an appxupload archive suitable for upload to the Windows Store and a Test folder containing a version of the application suitable for sideloading. If you answered No, note that the build process will only generate the Test application for you.
The appxupload file is the file that is ultimately destined for the Windows Store. It contains an appx package file for every platform that your application targets. These appx package files contain managed IL assemblies.
makeappx unbundle /p MyApplication_1.0.0.0_x86_x64_arm.appxbundle /d unbundled In directory unbundled, you should now have an appx package file for each target platform as well as some other files.
The following instructions should be followed for each (platform-specific) appx file that will be protected by Dotfuscator.
By default, Dotfuscator puts a Map.xml file in the output directory along with your obfuscated packages. For convenience in later steps, have Dotfuscator put this report somewhere other than the output directory.
${configdir}DotfuscatedMap.xml. Change this to ${configdir}Map.xml or anywhere else other than in the Dotfuscated output directory.First, open the Dotfuscator stand-alone UI. On the Input tab, add the appx package as the input for Dotfuscator.
If your appx is signed as part of the MSBuild process, you will need to configure Dotfuscator to re-sign it.
MyApplication_StoreKey.pfx; it should have been generated automatically for you by Visual Studio when you generated the appxupload file in the first place.
You can now configure the various Dotfuscator features (Renaming, Removal, String Encryption, etc.) as desired. Remember, though, it is best to get started with all of these features turned off to make sure that your general set-up is working properly. Then begin to turn on features one at a time so that you can comfortably adjust the settings for each feature (e.g. specifying exclusions in Renaming). If you are new to Dotfuscator in general, visit the Dotfuscator Quick Start Guide located on the Dotfuscator Support page to learn the basics.
Managing a separate Dotfuscator configuration file for each platform-specific appx package can get a bit onerous. Consider creating a configuration file that has a Project Property for the name of the input appx package file. You could then run Dotfuscator over each of the appx packages with the same Dotfuscator configuration file, supplying the value of the property on the commandline. Contact Dotfuscator Support if you need any further information on this strategy.
After running Dotfuscator on all of the extracted appx packages, you should have an appx file for each platform in the Dotfuscator output directory (${configdir}Dotfuscated by default).
Run the following command in the Developer Command Prompt for VS2015 (replacing ..Dotfuscated with the actual path to your Dotfuscator output directory and using the actual name of your appxbundle):
makeappx bundle /o /d "..Dotfuscated" /p MyApplication_1.0.0.0_x86_x64_arm.appxbundle
With the proper path to your pfx file and the proper name of your appxbundle, run the following command in the Developer Command Prompt for VS2015:
signtool sign /fd sha256 /f "....MyApplication_StoreKey.pfx" MyApplication_1.0.0.0_x86_x64_arm.appxbundle
You now have an appxupload that contains assemblies processed by Dotfuscator. It is ready to be uploaded to the Windows Store!
To get a Test application that is obfuscated, build the application with the Debug configuration. Open the assemblies’ project properties windows in Visual Studio. In the Build ‒ General section, ensure that Compile with .NET Native tool chain is unchecked for all platforms under the Debug configuration (it should be by default).
Choose Store > Create App Packages… in Visual Studio. This time, answer No to Do you want to build packages to upload to the Windows Store?. Also, choose the Debug configurations for all platforms.
This action will generate a directory having a name that is something like MyApplication_1.3.2.0_Debug_Test. Inside of this directory you will find an appxbundle. Extract the appx packages and run Dotfuscator on them just like you did in the early steps for the appx packages in the Store build. Repackage the appx packages, and sign the resulting appxbundle. Place the new appxbundle into MyApplication_1.3.2.0_Debug_Test. Sideload your application by running the Powershell script Add-AppDevPackage.ps1 (that can be found in the same directory as your appxbundle).
Note that this is still not entirely the same as what your customers will get from the Windows Store. Their downloaded application will have been compiled to native code by the Windows Store. It is not likely for there to be discrepancies between the managed IL and unmanaged native assemblies, but there are still some things that are not handled properly by the .NET Native compiler; Microsoft recommends testing the native code version of your application. If you think that this discrepancy is a problem for you, then you should seriously consider Method 1.